Black and Tan Paint Scheme Silverado

In ourHow to Paint Everything series, we take a look at different armies of the Warhammer universe, examine their history and heraldry, and look at several different methods for painting them. Today we look at the misbegotten – but soon to be massively updated – robot mummies of 40k: The Necrons.
Who are the Necrons?
The Necrons were first introduced in late 2nd edition as a group of enigmatic, silent robot invaders from the stars. They were known for being made of incredibly resilient materials and their ability to self-repair, standing back up again and again after being felled. They were also known for vanishing mysteriously back to whence they came, phasing out as an entire army when enough were disabled. The range launched with four metal models: Warriors, which came in two poses, Necron Lords, and Scarabs, and Destroyers, skimmer craft carrying a Necron Warrior armed with a larger gun. These early Necrons lacked a Codex, introduced in White Dwarf 217 and 218 as part of a Necron Raider list with a custom scenario, but they were the first new menace in the 40k universe since the Tyranid overhaul.
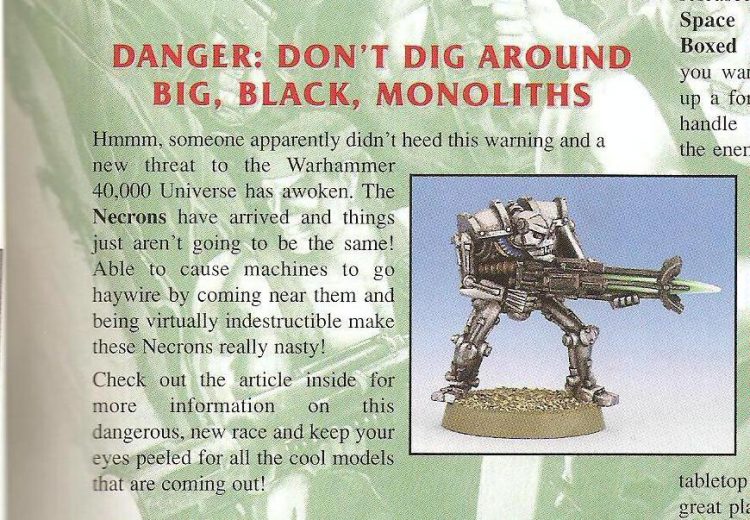
Necrons were further updated in 3rd edition through White Dwarf, when they received an additional troop choice and metal model kit in the form of the Necron Immortals, who stood taller and bulkier than warriors, and carried a more damaging gun. At the time, Necron lore still had them as an ancient race of undead robots awakening from a long slumber and making first contact with the Imperium. The rules themselves were unfinished at this time too — The Chapter Approved article itself said as much and asked readers to send in postcards detailing their experiences playing against the Necrons in order to help the designers balance the army!
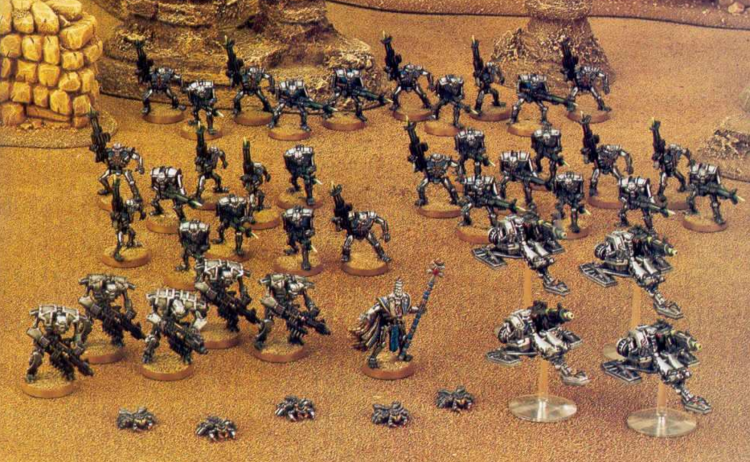
However it would be some time before Necrons would finally receive the treatment they deserved – almost three years, in fact! In April 2002, Games Workshop released the first everCodex: Necrons, along with a whole new range that included plastic versions of old units like the warriors, scarabs, and destroyers, and all-new units like the Monolith, Flayers, Wraiths, and the C'Tan. Gone were the goofy, bulky robots of old – these new Necrons were thin skeletal, warriors asleep for millions of years after a devastating war with the Old Ones left the galaxy in ruins. They were the silent servants of the C'Tan, immortal star gods known for eating entire stars and souls. And now they were back and ready to reclaim a galaxy that was rightfully theirs. They still phased out of the battlefield if you killed 75% of them, but now they had some incredible new models and some sick green plastic rods. These Necrons were the implacable warriors of an uncaring, unknowable race of near-omnipotent beings, ancient enemies of the Eldar whose motives were to feed their ever-hungry gods. But narratively, this was a bit of a problem: While the Necron threat was real, and they were pretty scary, there wasalreadyan unfeeling, uncompromising threat besieging the universe that couldn't be bargained with, and that was the Tyrands. Necrons lacked personality, and the only characters with the ability to talk in the army were its two C'Tan – the Nightbringer and the Deceiver, and of those one mostly just murdered things.
The Necrons would see another major overhaul to their story with the release of their 5th edition Codex, which came with more new models and fleshed out the range and backstory. No longer were the Necrons all silent servants of star gods, now the star gods were theirs to command. Hailing form a small planet orbiting a deadly neutron star, the Necrontyr were technologically advanced but lived brutal, short lives, often riddled with cancer and disease to their frail forms. When they encountered the advanced, immortal Old Ones they demanded the Old Ones share the secret of Immortality. The Old Ones refused, and the War in Heaven began. The Necrons were no match for the Old Ones initially, and were beaten back again and again, until their empire dwindled and they were left with only their homeworld. That was when the Silent King Szarekh first contacted the C'Tan, immortal star gods as old as the universe itself. The C'Tan offered the Necrontyr a path to immortality that had them transferring their essences into metal bodies but losing their souls in the process, leaving those behind to be devoured by the C'Tan. In this form they became the Necrons, and they were immortal and powerful, but an emptiness gnawed at them. Working with the C'Tan, the Old Ones were no match for the Necrons, and soon they had been driven to desperation, seeking help from the psychic races they had spawned, creating more psykers in the process. As the Necrons won and the C'Tan turned on each other out of boredom and hunger, the galaxy became a fertile feeding ground for warp entities, eventually becoming overrun by warp beings called Enslavers that feed on psychic energy.
With the Old Ones defeated and the universe in disarray, the Silent King at last turned their weapons on the C'Tan, shattering and enslaving them in an act of revenge for stealing the souls of the Necrontyr. With his work done, the Necrons retreated to a deep slumber, staying dormant for more than 60 million years as the Enslavers eventually starved off and the galaxy evolved. Meanwhile Szarekh, the silent king, freed his people from the mental programming that bound them to his will and fled the galaxy, looking for penance in the dark space between galaxies. Unlike their original incarnations, the Necrons are no longer mindless automata, and are now led by Overlords who retain their personalities and seek to rebuild the dynasties of old. They war amongst each other and squabble for power with no clear successor to the Silent King, and have been known to work with the Imperium when it suits them. Most famously when they worked with the Blood Angels to stop a Tyranid invasion of Baal. Their current iconography draws heavily from Egyptian and Persian jewelry and hieroglyphics, and their technology makes heavy use of a material called blackstone, which is coveted by the Adeptus Mechanicus for its anti-psychic properties.
Where to Read More
The Necrons are primarily viewed as antagonists in 40k fiction, and have very little personality in those early pieces of fiction owing to how they were positioned. There's been more recently, but it's still tough to find a book with Necrons where they get to be more than enemies.
- The Everliving Legionis a collection of short stories focusing on the Necrons and various aspects of their culture.
- The Fall of Damnos, Dead Men Walking,andThe World Engineall show Necrons as antagonists, but do so in a strong way, with Dead Men Walking considered the strongest of the bunch.
- The Gathering Storm I andShield of Baalcampaign books from late 7th edition both feature Necrons in key roles working with the Imperium to protect key worlds from threats that they'd rather not deal with themselves. In Gather Storm, Trazyn works with Cawl and Imperial forces to stop Abaddon and inShield of Baal Anrakyr works with the Blood Angels and the Mephrit dynasty to fend off a Tyranid invasion.
- Fabius Bile: Clonelordis the sequel to Primogenitor, and while it's really a Fabius Bile story, it does feature Trazyn the Infinite in a major role, and details how he came into possession of one of his greatest prizes.
Playing Necrons
Want to do more than paint your Necrons? Check out our guides here:
Warhammer 40k
- Necrons just got a completely new codex for 9th edition! Check out our review of it here.
Kill Team
- We've also got a guide to Necrons in Kill Team, where they fare a bit better. Check out Kill Team Tactics – Necrons.
Painting Necrons
In their earliest incarnations, Necrons were a simpler force, consisting primarily of robots clad in metal bodies with little adornment. As the faction has been revised, they've become more elaborate, and subfactions that call for different color schemes have emerged, creating a good deal of variety in the way you can paint them.
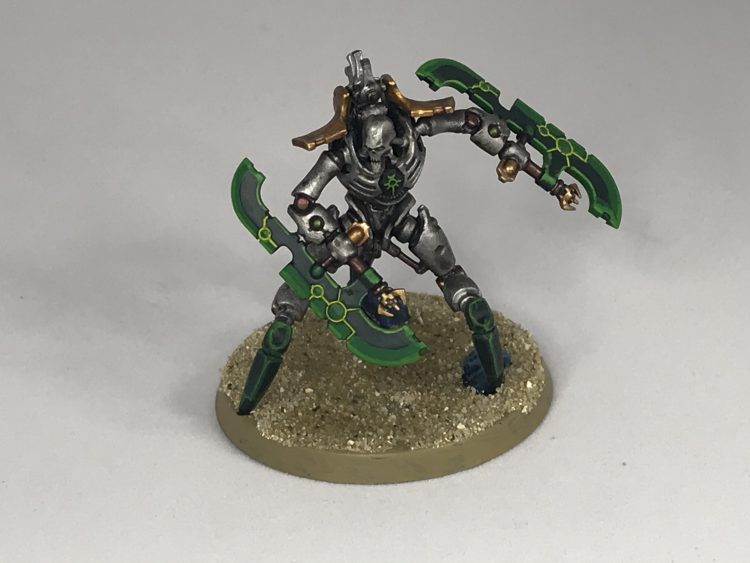
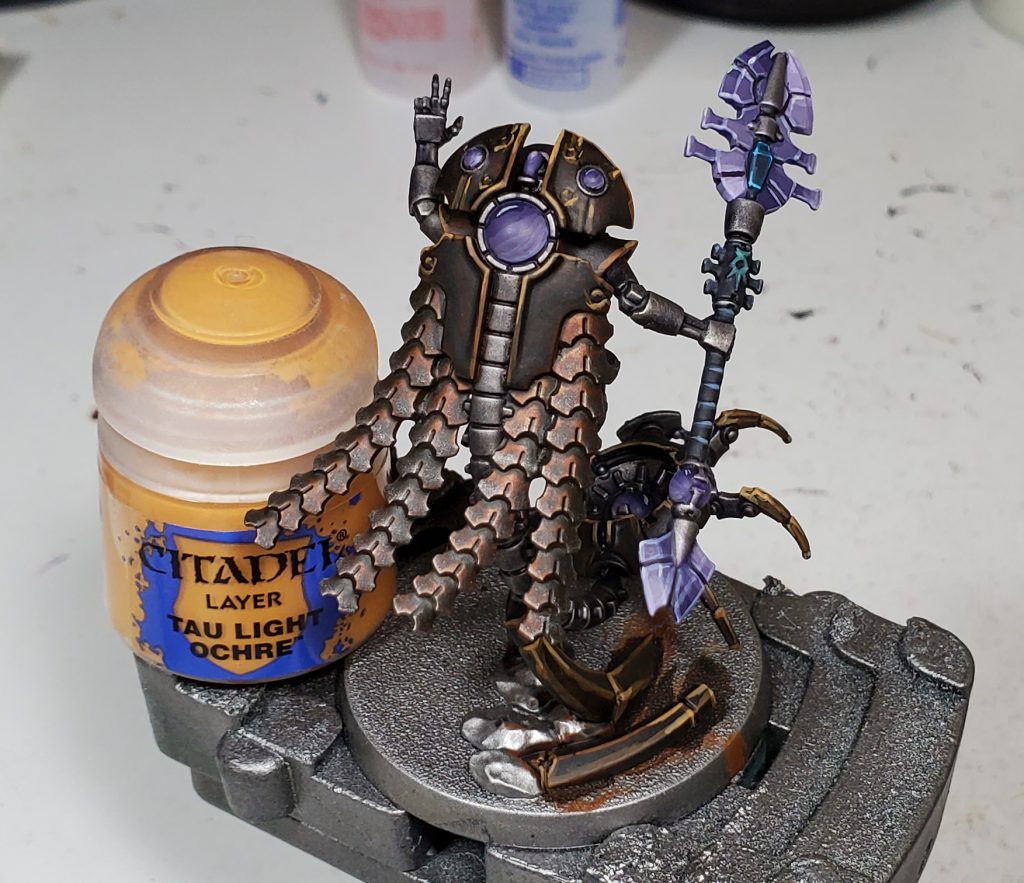
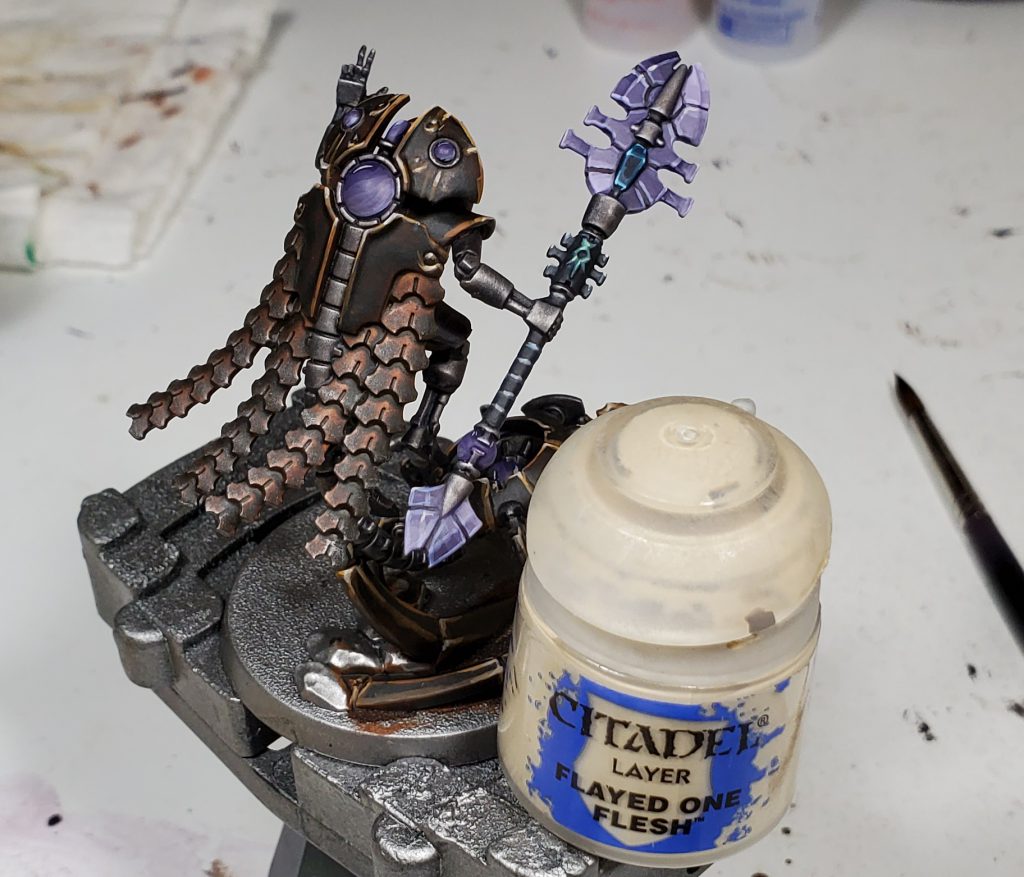
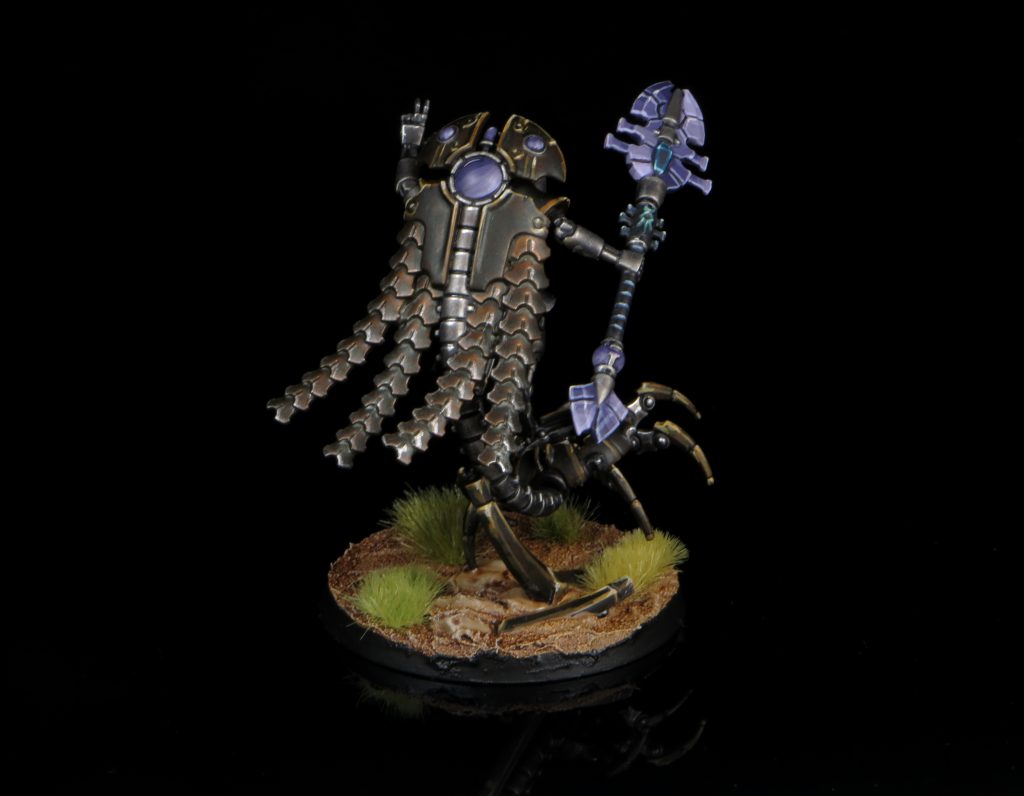
Szarekhan
The newest(?) dynasty are the Szarekhan, followers of the Silent King. Now that he's back from his 60-million-year midlife crisis joyride around the galaxy's outer rim, they're back with a vengeance. They're unlike the other Necron factions in that they're primarily a gold or burnished bronze color.
Skails' Method
Paints Used: Scale 75 Victorian Brass (sub Citadel Screaming Bell) Scale 75 Pure Copper (sub Citadel Brass Scorpion or Runelord Brass) Vallejo Game Color Silver Vallejo Game Color Polished Gold Citadel Leadbelcher Vallejo Game Color Dark Green Vallejo Game Color Goblin Green Monument Yellow Green Vallejo Model Color Basalt Grey Vallejo Model Color German Grey Vallejo Game Color Stonewall Grey Monument Dark Grey Blue Citadel Reikland Fleshshade Citadel Nuln Oil Citadel Lahmian Medium Umber Ink Wash (this is a custom mix of Umber Ink 1:1 with matte medium + about 4 drops of flow improver to mimic contrast paint- Sub Contrast Wyldwood) Copper Armor: Basecoat with Victorian Brass (optional- just pure copper could be used to save time for battle ready), then cover everything but the recesses with Pure Copper. Mix Pure Copper and Silver about 1:1 and apply to to the areas where most light would catch, under eyes, along cheekbones, upward facing parts of arms, feet, and legs.
Stipple Reikland Fleshshade on the bottom half of armor panels, and downward facing parts of arms, and along bottom of rib cage. (The stippling can be more of splotching and even slashes.) Hit The stippling can be more of splotching and even slashes the recesses with Reikland, then do an all over smooth wash when it dries, this is more as a filter than shade. Next stipple the Umber ink wash along the bottom edges of everything previously stippled. Try not to just cover up the Reikland stipple, leave it showing so that there is a transition between the heavier pigmented ink and the cleaner armor.
Edge highlight the armor with Silver mixed with just enough Pure Copper to give it a hint of color. Brush everything with Lahmian to give it a uniform sheen.
Bones and Joints: Start with German Grey over everything but the recesses. Mix Basalt Grey and German Grey 1:1 for a thick edge highlight and along the centers of bones. Mix Stonewall Grey and Basalt Grey about 1:1 along with enough Dark Grey Blue to give it a slight bluish tint. Give a light drybrush of Leadbelcher, just enough to give it a slight metallic edge. Silver Armor: Basecoat with Leadbelcher. Stipple/Splotch armor with Nuln Oil along the bottom half of the large plates, and along sides of pillars, then wash in the recesses.
Thin the Umber ink about 1:1 with water (If you use Wyldwood contrast, water will work fine for thinning, contrast medium is not necessary for this technique) and splotch it around somewhat randomly to give the armor a stained/dirty look. Brush armor with Lahmian to give a uniform sheen.
Gauss: Paint the glowing parts with Yellow Green. Then paint Dark Green over all the glowing bits and a thick line on the edges of the Gauss tube. Do a thinner Highlight of Goblin Green on the edges and over the glowing bits. Next a final thin highlight of Yellow Green over the edges and over the glowing bits.
Gauss Blaster: Metal bits were dry brushed with Leadbelcher. Body of blaster has a thick highlight of Dark Grey Blue. A final thin edge highlight of Stonewall Grey with just a bit of Dark Grey Blue.
Gold: The cape and hieroglyphics on the chest were given a base coat of Polished Gold. Then an all over wash of Reikland Fleshshade. Next an edge highlight with Silver. For the finished photo I gave the recesses in the cape another careful fill of Reikland for some more definition. Then the circles were painted with a combination of grey and Monument Metal Medium, then a dot of white and Metal medium at the top. The forehead stripe was done with a base coat of Pallid Wych Flesh, then Metal Medium and Wych Flesh mix. A final highlight at the brow and top of head was done with Metal Medium and white mix.

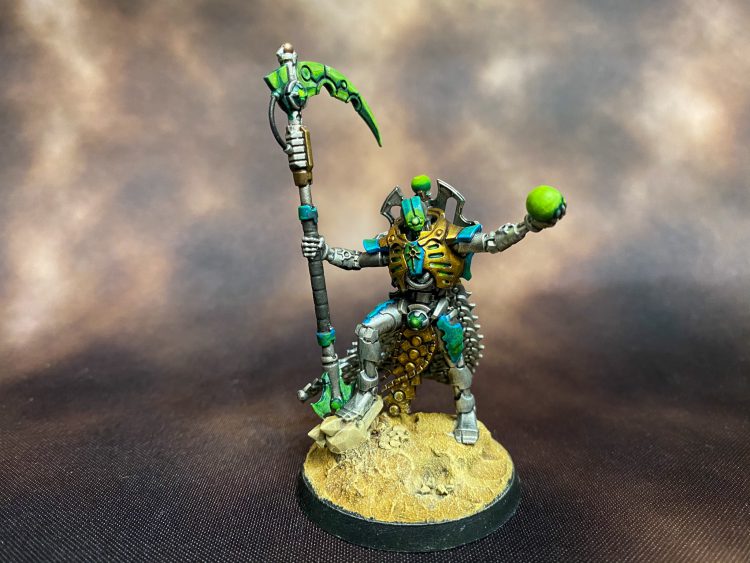
Nihilakh
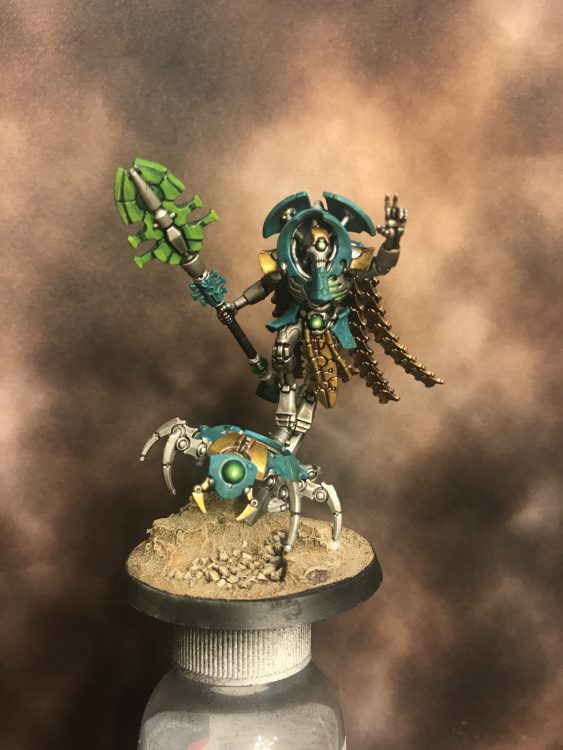
The Nihilakh dynasty are visually notable for combining teal and gold/bronze coloring on their armor. Most notably, Trazyn originally hails from this dynasty, and the studio paint job for Orikan the diviner also follows this color scheme.
Kamichi's Method
I love the ostentatious colour scheme of the Nihilakh Dynasty, not afraid to show off their riches on even the lowliest Necron Warrior. Paints used: GW: Leadbelcher, Nuln Oil, Nuln Oil Gloss, Stormhost Silver, Retributor Armour, Reikland Fleshshade, Liberator Gold, Sotek Green, Skink Blue, Tyrant Skull, Steel Legion Drab, Lamenters Yellow (or Iyanden Yellow), Moot Green, Biel-Tan Green, Abaddon Black, Iron Warriors, Yriel Yellow, White Scar (Optional: Caliban Green, Warpstone Glow) My Necrons start as most Necrons do; with a healthy spray of Leadbelcher. I then tend to hit them with a quick drybrush of Leadbelcher as well. This serves two purposes as it means any touch ups I need to make later on will match as the Leadbelcher in the pot is a slightly different tone from the spray can, but it also provides a better texture for shade to cling to. The model is shaded with a 50/50 mix of Nuln Oil and Nuln Oil Gloss, then finished up with a light drybrush of Stormhost Silver. To separate the weapons from the body I start from an Iron Warriors base and give this a couple of coats of the 50/50 shade mix before drybrushing with Stormhost Silver.

The gold is a simple basecoat of Retributor Armour shaded with Reikland Fleshshade for a nice, vibrant gold. I then drybrush the edges with Liberator Gold before being finished with a very light highlight of Stormhost Silver on the extreme edges.
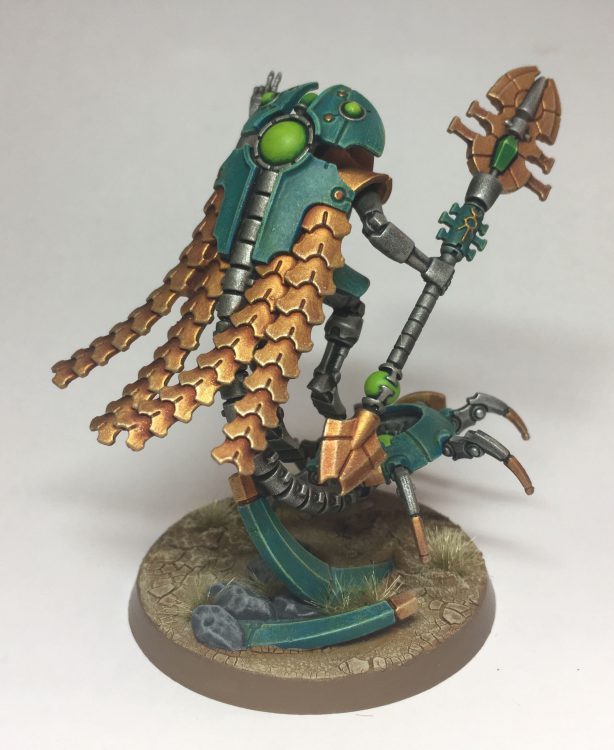
Then it's time to tackle the Nihilakh Dynasty's characteristic blue! I start with a Sotek Green basecoat which I then drybrush with Skink Blue. I try and get a bit of it on some of the larger surface areas without it appearing streaky as it adds a little bit of texture for the later steps. Next up I drybrush the edges with Tyrant Skull, which goes over the Skink Blue to give a bit of a greenish tint to the edge of the pieces. Once the drybrushing has dried, I make an almost glaze-like wash of Steel Legion Drab. This is applied across the surfaces of the blue, without letting it pool into the recesses. If anything you want thin areas of pooling on the surfaces as this will break up the big flat areas of blue later on without looking too blotchy, so long as you've thinned your paint enough. It might take a bit of practice but it's worth getting right. Finally, I glaze the entire section with Lamenters Yellow (I bought up a big surplus but you could create a glaze using Iyanden Yellow Contrast and some Contrast Medium) which is thinned slightly. I've found that using straight from the pot can lead to some overly green sections, which isn't what I'm looking for, so the thinning really helps to dilute some of that colour and turn it to the characteristic turquoise-esque colour.

Once the main colours are done, I finish up the greens. Most of the green is started from a couple of thin coats of Moot Green. For cables and orbs I then wash towards the connection points with Biel Tan Green which is left to dry and then another coat of thinned Moot Green is used to blend the edges away from where the shade has dried. If you wish to highlight this a little further, a mix of Moot Green and Yriel Yellow in a 3:1 ratio works well. For eyes, a simple OSL is achieved by first using a thinned Moot Green in the recessess of the eyes and allowed to dry. Once that's done, use that same 3:1 ratio of Moot Green and Yriel Yellow to paint the eyes. I then like to mix some white into this mixture to make the eyes really stand out as the light source.

That covers the majority of the sections. For some models like the Canoptek units I'll make the eyes look more like traditional lenses, starting from Abaddon Black and using the quarters method for painting the lenses. If you're not sure what that is, break the lens up into four quarters and loosely paint the first colour (which in this case is Caliban Green) into three of the four quarters (I usually leave the top right quarter alone) maintaining the shape of the lens. Once you've got a base down for your green, start reducing the amount of space your highlights take up as you work through mixes of Caliban Green and Warpstone Glow, straight Warpstone Glow, and then mixes of Warpstone Glow and Moot Green until you get to a final highlight of Moot Green and Yriel Yellow in that same 3:1 ratio as before. Dot the still-black quarter with some White Scar and job done! 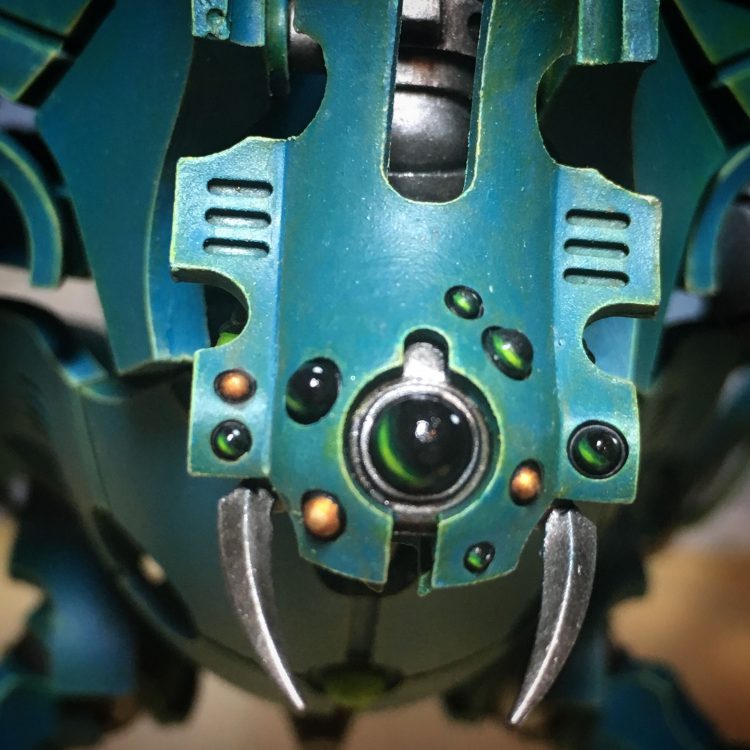
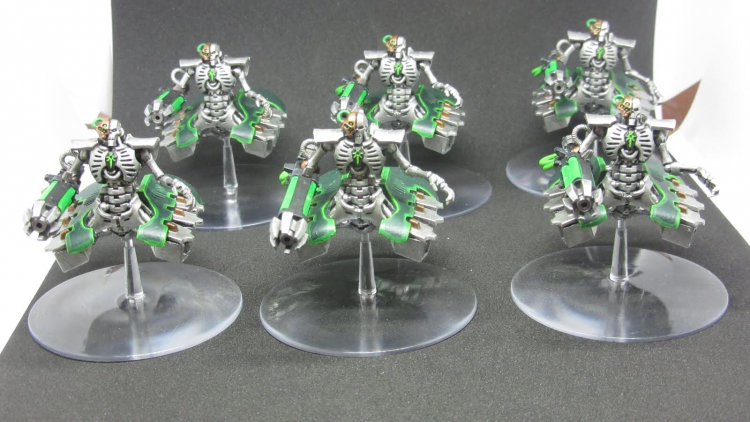
ZuultheCat's Method
Nihilakh Supremacy. Nihilakh is my favorite dynasty, and not just because I once got a shout out on how to paint them. If someone ever tells you "Painting Necrons seems like it would be really easy because you're basically just spraying them silver", listen to them because they're 100% right. Necrons are an easy army to knock out quickly. I painted up my entire Necron army in less than two months, starting on March 8th and finishing them at the on May 5th.
My method of painting Necrons is simple. It's made up of a few simple steps that when added together looks great. The metal skeleton is the first step. Simply prime then wash the models. I primed my Necrons with Bare Metal Primer from Ammo by MIG and then washed them with 2 coats of Nuln Oil, letting each coat fully dry before proceeding to the next step. The skeleton should be very dark following 2 directly coats of Nuln Oil. Following this the entire skeleton gets a drybrush of Necron Compound, starting from the top and only brushing straight down.
The teal bits are very simple: 2 base coats of Sotek Green to get a solid base coat. Once this is dry, load up some Temple Guard Blue on a small dry brush and get most of the paint off, like you're going to drybrush. Stab the brush directly onto the sotek green parts, breaking up the solid blue base coat. Once this dries, simply glaze over the teal parts with an undiluted coat of Lamenter's Yellow. If you don't have any of that long-lost liquid gold, you can mix up Iyanden Yellow contrast paint with Contrast Medium or just make your own Lamenter's Yellow. The green is the part that takes the longest on my models. For this, I use the following paints in successive, very thin layers, building up the intensity through successive layers: Caliban Green, Warpstone Glow, Moot Green, Yriel Yellow and finally Skull White. Make sure you let each layer dry before moving onto the new one. The Gold is relatively simple. I use two different methods for the gold in this army. Troops got a simple base coat of Retributor Armor followed by a wash of the contrast paint Guilliman Flesh thinned out. The characters & vehicles got a treatment of Scale 75 gold paints. Starting with a base coat of Decayed Metal, then Dwarven Gold and lastly Elven Gold. Once this is all laid down, I give it a thin coat of Guilliman Flesh. The Black sections are by far the easiest – simply do 2 thin layers of Vallejo Black. That's it! A few simple steps that make for a striking appearance on the table top.
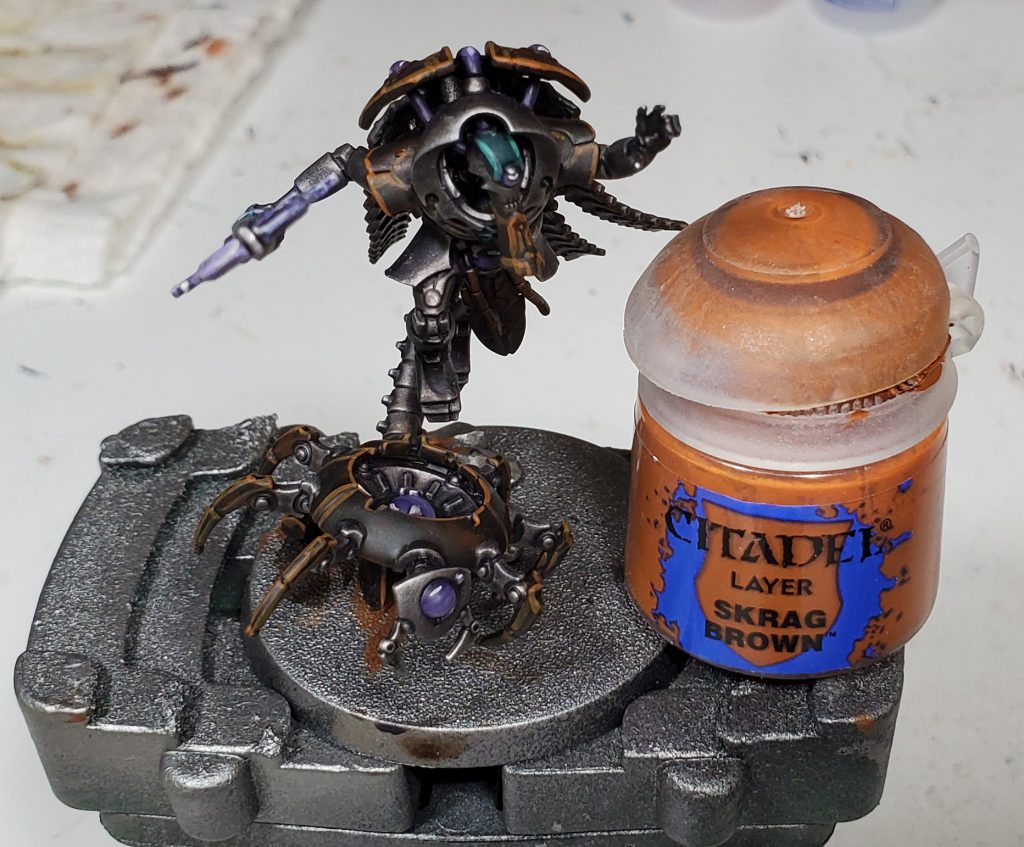
TheChirurgeon's Method
I painted Trazyn up here as an ally for my Astradus campaign, since he's the perfect kind of character to have ally or work with any faction to accomplish his own ends. I went with a quick studio default paint job on him, and he painted up pretty quick. The metal body isLeadbelcherwashed withNuln Oiland then brushed with Leadbelcher andRunefang Steel for edge highlights. The teal parts are painted with a base of Incubi Darkness then covered withSotek Green and edge highlighted with a 50/50 mix of Sotek Green andReaper Pure White.I painted the gold bits withRetributor Armourand then washed them withAgrax Earthshadebefore edge highlighting them withIronbreaker.The green parts are basedCaliban Green, then I work up toMoot Greenand edge highlight withOgryn Camo.
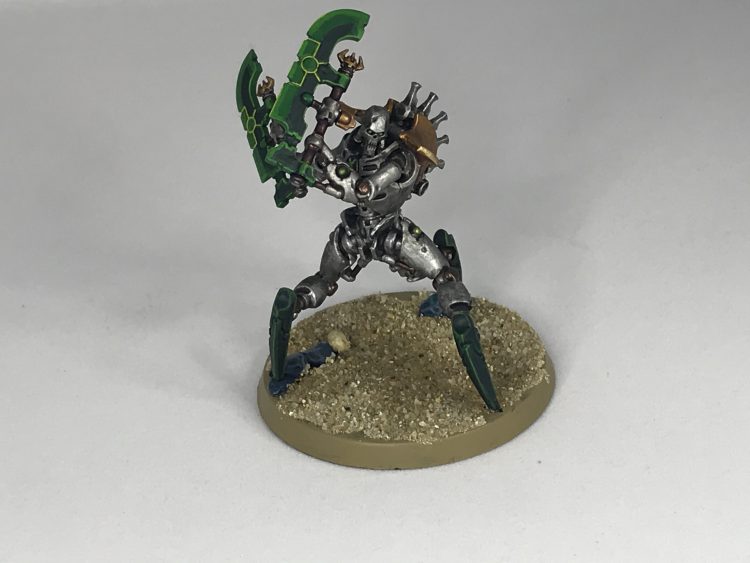
Sautekh
In many ways the "Default" Necron style, the Sautekh style is most reminiscent of the 3rd edition aesthetic from the Necrons' big debut as a codex faction, combining silver and green with darker gray/black portions on models like the monolith and destroyers. It's a striking scheme and as a bonus, easy to paint.
One_Wing's Method
While it doesn't feature on the site nearly as frequently as my Eldar, I have a moderately sized Necron army already and am eagerly looking forward to them maybe being… good actually? I started the army up around the time of the 8th Edition codex release – it was just getting to the point where I was bored of using my Eldar at club nights and starting to do enough events that I thought having a second army to use would be a good idea. I also, bluntly, thought they would be pretty easy to paint, and selected the Sautekh scheme for my army because it was super simple. That did, basically, turn out to be true, but ironically the process of working on this army (plus some other projects I was doing in parallel) was enough of a level-up moment for my painting ability that by the end I was looking for ways to add a bit of flair rather than keep things easy! The baseline method I started with was inspired by two GW painting videos – one for how to do Sautekh warriors, and one for how to achieve the "glowing green" Necron vehicle effect. The former I follow pretty closely, the latter I adapted a bit to simplify, leaning a bit more into the green. My Destroyers are a good example of what I've ended up with in the past:
For Indomitus, I decided I wanted to start out with the Skorpekh Destroyers, as they're an exciting new unit and I thought they'd provide a decent canvas to work on. The Skorpekh Lord is also the unit I'm most excited by on a tactical level, so warming up on the Destroyers seemed like a good plan! Step 1, of course, is to assemble all required tools – I set up here with the sprue for the Skorpekh and roughly the set of paints I thought I'd need. 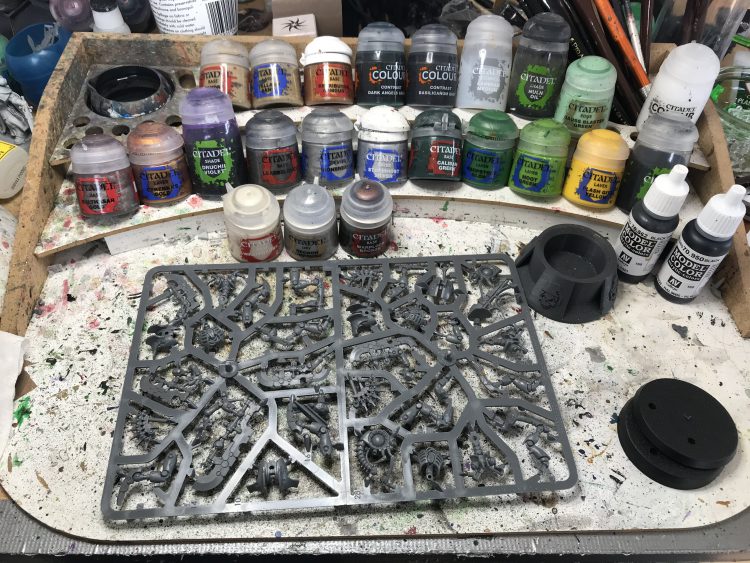 For monopose models where it's important to keep parts together, but I still want to do clipping and cleaning of plastic in a batch, I tend to flip the bases upside down and keep the parts together in those once they're cleaned.
 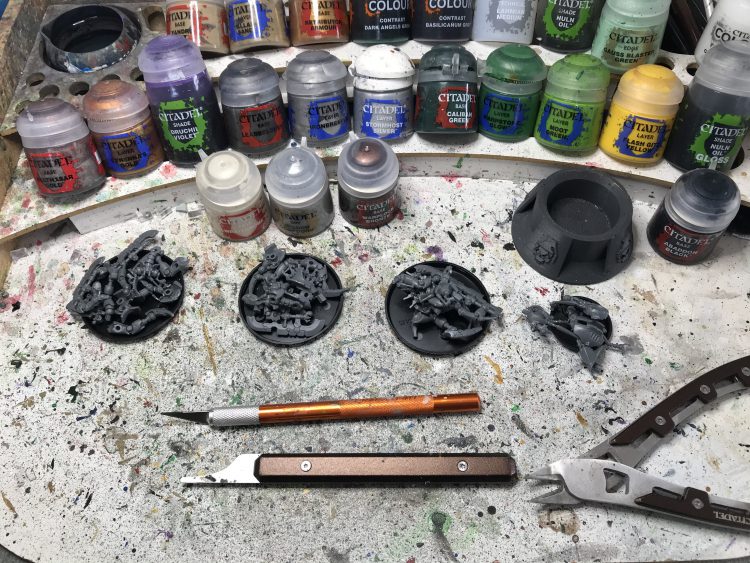 From there, assembly time. Here I thought I'd test the theory that you can build these without glue, and the answer is that yes, you can, and they're mostly fine. There were a couple of joins that were a little bit looser than I'd like (so I did add glue to those after testing the dry fit) but if you really wanted to go glue-free you could. The hardest parts to work with were faces – GW have devised a clever way to hold these into place, which is that they're attached to one of the arms and sort of get twisted into position and held by the tension, whichworks but is a little fiddly to line up, and the main place I went "screw it, adding glue".
 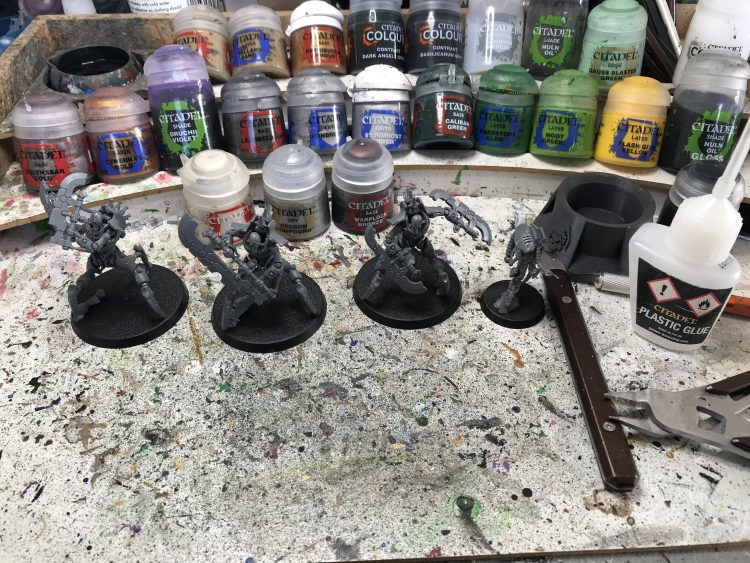 Next, priming. I just use a Citadel Spray Stick and Chaos Black Primer and it basically works. I did need to do a little extra manual priming under the lets once done, as it's harder for the spray to reach, but this was minimal.
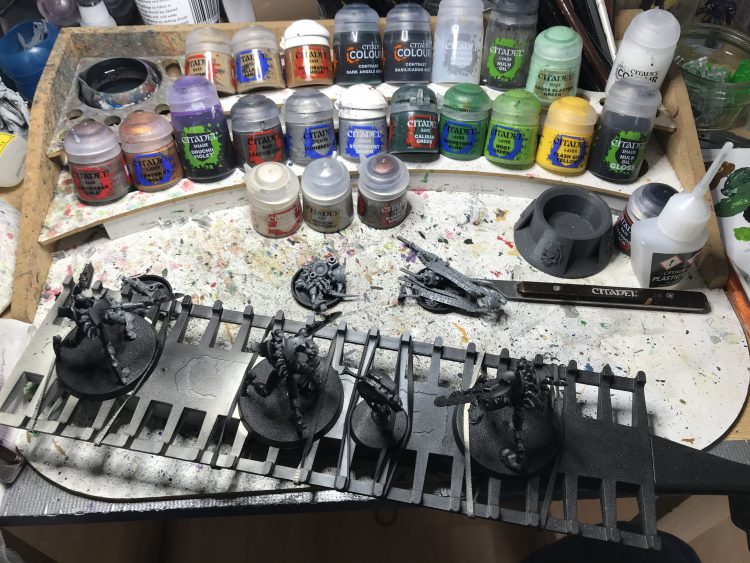
 Once the models are ready to be painted, the first step is to work out what's getting a metallic treatment, and which parts of the model are "Canoptek stuff" and get the green stone treatment. Here there are distinct design differences to the last segment of the legs that fit the latter, so that's where I decided to make the split. My recipe for energy weapons is also a modified version of the same. Once that's figured out, I based everything that was going to be metallic in Leadbelcher thinned with Lahmian Medium, and everything Canoptek or an energy blade in Caliban Green thinned with water. Previously when working on Canoptek stuff I've used Caliban Green Spray (now out of production), and what I found here was that CG paint alone was a little bit more of a vibrant green than I really wanted for the base on the legs. Here I salvaged it by darkening down with a wash of Dark Angels Green contrast, for all later models I used 2:1 Caliban Green/Incubi Darkness, which gave what I wanted straight away. Once both are applied, I then apply a layer of thinned Ironbreaker to the silver as well.
 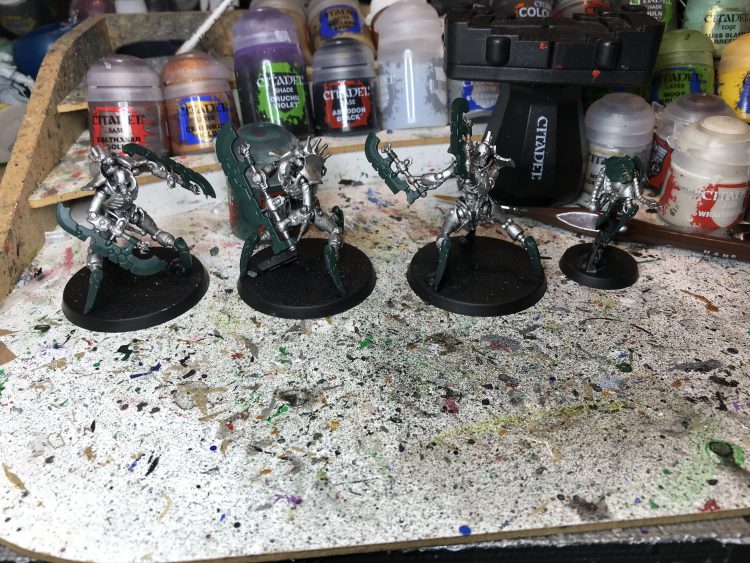 That then gets washed with Nuln Oil to darken it down, especially in the recesses, followed by a drybrush with Necron Compound on bits that are going to stay silver to complete it. I do this all now because when drybrushing such a large proportion of the model there's a risk of getting some on other areas, which I'd rather be able to correct by re-applying the base than having to redo any edge highlighting.
 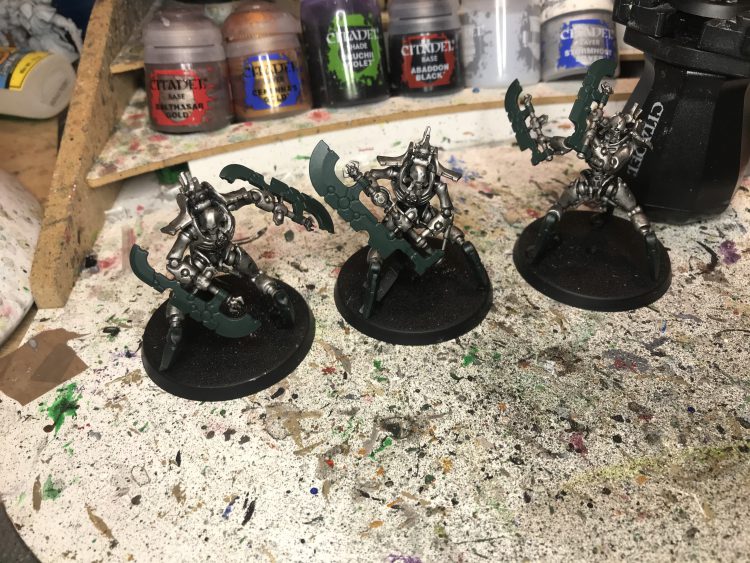 With that done, we can now work on various green things. We start off with thinned Warpstone Glow, edge highlighting the claws and doing thin two coats of it on the angled bit of the blades, plus a few other raised bits on the weapons. We also edge highlight the canopy on the little helper here.
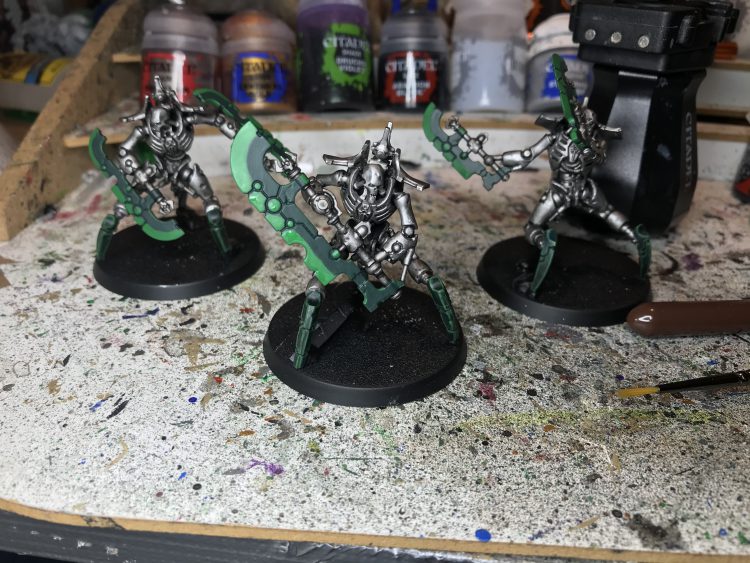
 Now we base in some other metallic. To add some visual distinction on parts of the model, I use Warplock Bronze (later shaded with Nuln) on some other "mechanical" bits such as the weapon handles and arm joins, while using Retributor Armour to base the shoulder pads and weapon protrusions.
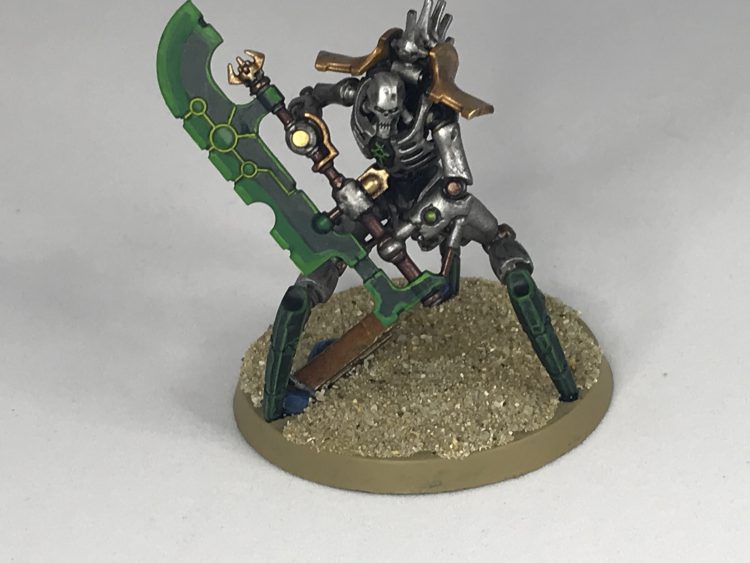
  After that, now we're done with any paint applications to wide areas, we finish the legs and blades. The legs get an edge of Moot Green applied via very gentle drybrushing, while for the blades 1:1 Moot Green/Warpstone Glow is used to edge round the back of the weapon, and do a much thicker line on the blade cutting edges. The blades are then finished by a thin edge highlight of Flash Gitz Yellow direct on the blade cutting edge, and an energy glow added to the recesses. To do the latter, I mixed about 2:1 Flash Gitz Yellow and Moot Green and then thinned it down alot with water. With a detail brush, I then applied it to the recesses, letting capillary action draw it in and wiping any that escaped away quickly with my thumb. This also goes on any of the "vents" that Canoptek canopies tend to have.
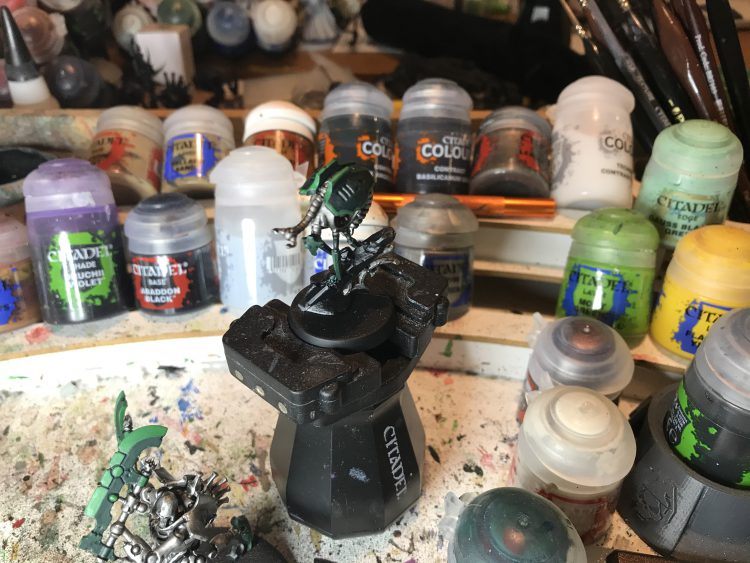
 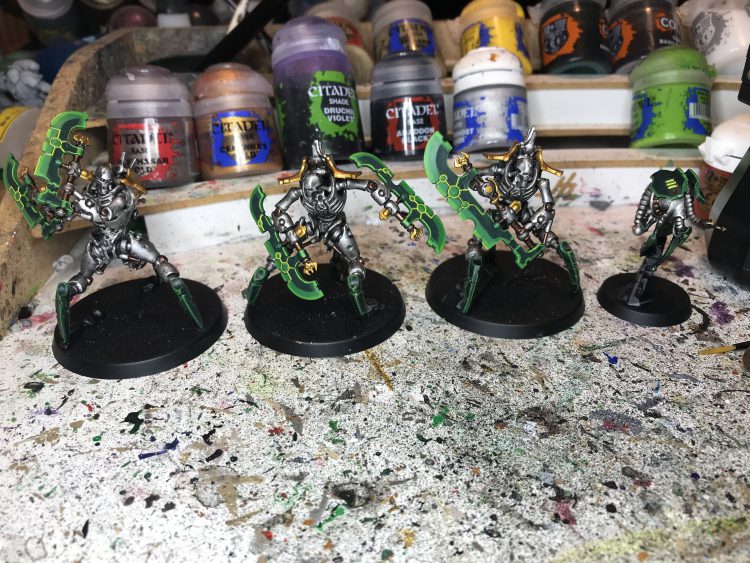 From here we're nearly done. The gold parts get washed with Druchii Violet, then drybrushed with Gehenna Gold and then lightly drybrushed on the edges with 1:1 Retributor Armour/Stormhost Silver. The models have what are clearly "energy orbs" on a few places, so these I hit with Stormhost Silver then thinned Ork Flesh Contrast. For the Plasmocyte, I gave it an evil glowing red eye using Blood Angels Red Contrast over the silver instead. Finally, as these are still non-royalty among the Necrons, they get a black chest runeplate, with the rune itself picked out with Moot Green. A dot of moot green on each of the eyes, and the models themselves are done.
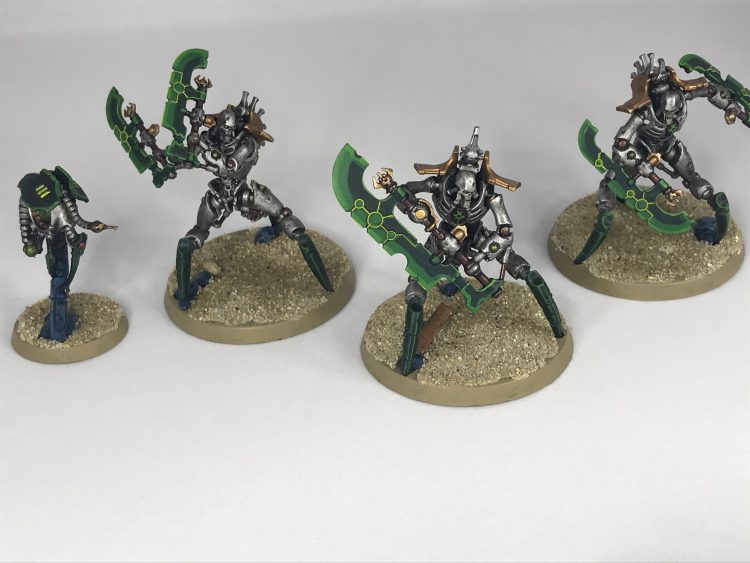
 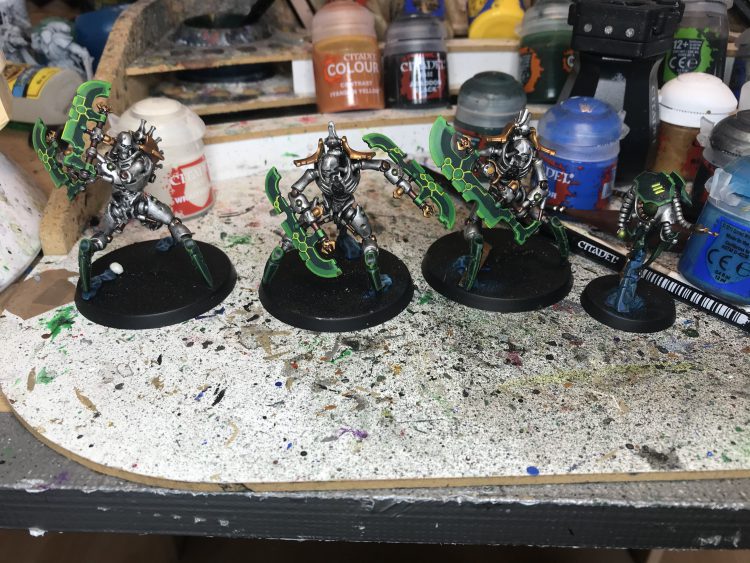 As you can see above, I've also worked on the bases. A lot of Indomitus models have some scenic parts where their legs join the bases to hide the pegs for attachment. I've done brown or grey stone on the bases of my Necrons before, but always been vaguely disappointed in how it looks. I decided to change that up for these (and will update some of my other models down the line) and do a blue marble recipe I've recently been using on statues. This contrasts much more interestingly with both the silver Necrons and the yellow sand of the bases. The recipe is:
- Base Caledor Sky
- Wash Hexwraith Flame
- Wash Drakenhof Nightshade
- Drybrush Sotek Green
- Very lightly drybrush Gauss Blaster Green – you only want to hit the sharpest edges.
Any metals on the bases were done in Balthazar Gold or Leadbelcher depending on whether they were ornamental or industrial, and washed/drybrushed appropriately. Finally, the bases themselves were painted with two thin coats of Zandri Dust, ready for PVA and sand. With that, the models were complete!
I have actually gone back and added some Mordheim Turf tufts later on alongside others, as you'll see in the group photos.
Novokh
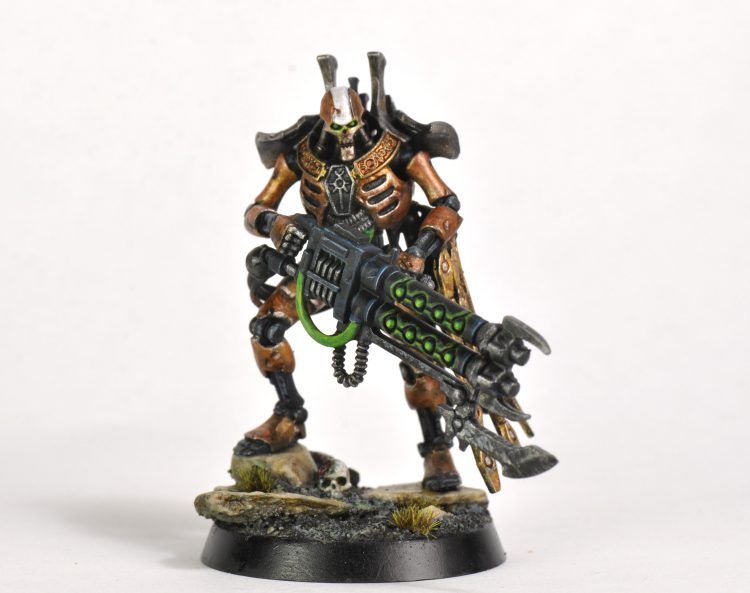
The Novokh Dynasty are close combat monsters on the battlefield, and are visually distinct with a striking red color scheme that uses splashes of white.
TheChirurgeon's Method
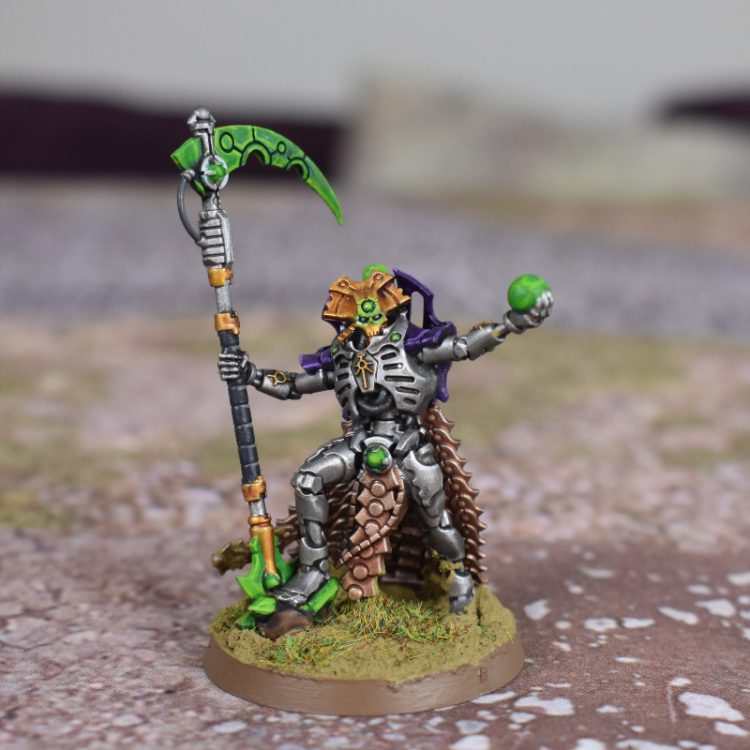
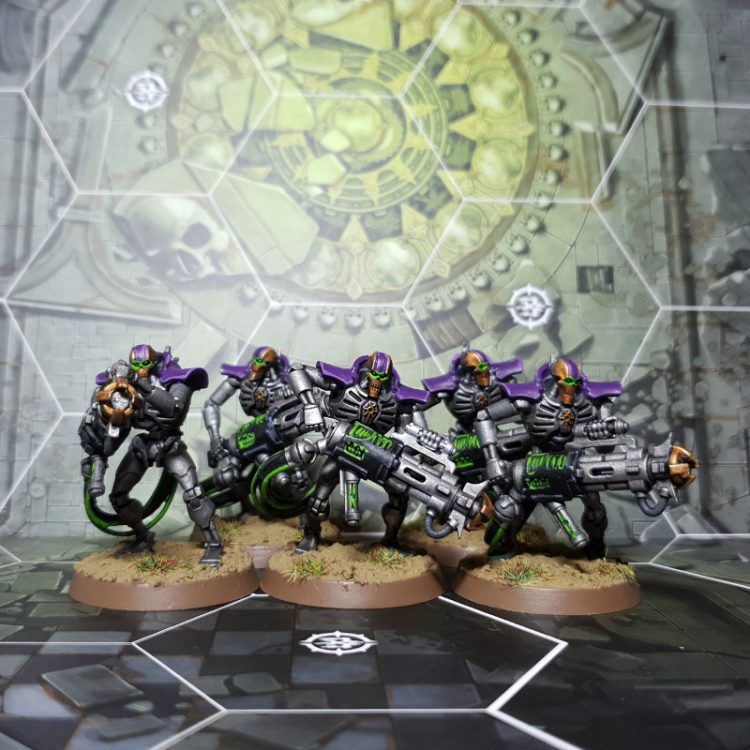
The models in the Indomitus box are my first Necrons – I've previously thought about doing Necrons but never pulled the trigger on them. I'm kind of glad I waited now because these models are awesome — they wonderfully combine the creepy eldritch horror of the 3rd edition Necron fluff with the character of the Tomb Kings-style 5th edition reboot. I've always really liked the red Necrons that one of my college roommates painted, and so I wanted to do something similar in style to his Necrons, albeit with a little more visual flair on the characters. I also wanted to get away from the green energy rods, since the red/green combo can end up looking a little too Christmas-like. So the general scheme – and I've decided they'll be Novokh – is to do deep red shoulder plates, chest armor, and heads for the core warriors, with more red plating for higher-ranking models in the army. I've decided to do the heads on my characters with a bone color, because it looks bad ass and gives them more of an undead feel.
Necron Warriors
For the Necron Warriors I went with a really simple scheme that can be easily replicated across a large number of models. Metal bodies, Red chests/shoulders/helmets. It's roughly a 9-to-12 step process. 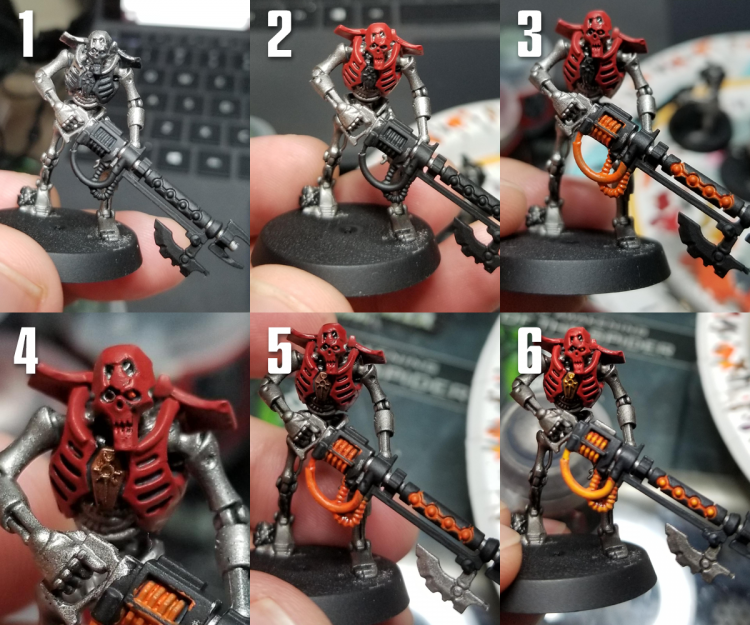 Step 0:Prime black. Always black. Step 1:I start by doing a base coat ofLeadbelcherall over the main parts of the body that won't be red. My reds have pretty good coverage, so I can afford to be a bit sloppy here. I also want to get the spots on the head where the mask is broken. Step 2:Time for the red. This isMephiston Red covering the chest, shoulder, and head plates. The back of the head is still kept silver. Step 3:I'm doing orange weapons. I do a few thin coats ofTrollslayer Orange to start. Dot the eye, do the glowing parts of the gun and the cables. Step 4:The chest emblem gets paintedBalthasar Gold. Step 5:Time to wash everything.Nuln OIlon the Leadbelcher parts,Carroburg Crimsonon the Red,Agrax Earthshadeon the gold, Contrast Gryph-Hound Orange on the orange parts. Step 6:Highlights. I do layers of Mephiston Redon the red armor on the raised parts of the chest, helmet, and shoulder pads. I highlight the orange with Trollslayer and Fire Dragon Bright, edge highlight the gold withRetributor Armour, and drybrush the metal armor withNecron Compound. This is also when I'll hit the gun's black parts withCorvus Black.
 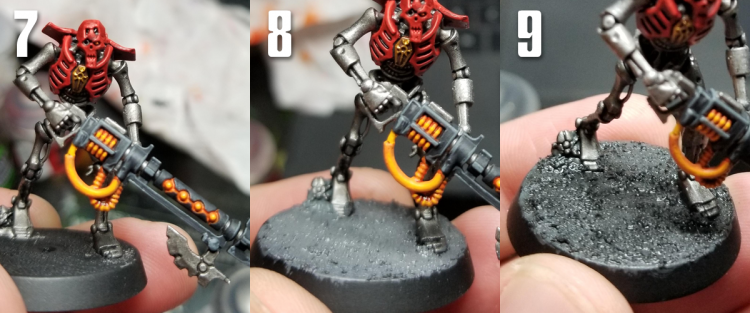 Step 7:Edge Highlighting. I edge the red withEvil Sunz Scarlet.The black gun gets edge highlighting withMechanicus Standard Grey, and the orange gets a final touch of Fire Dragon Bright mixed withYriel Yellow. Step 8:The base! I slather it all inAstrogranitetexture paint. I also paint the stone by the foot and the scarab with Leadbelcher. Step 9:Wash the whole thing with Nuln Oil. Once that dries, drybrush it withCelestra Grey.
And that's the finished Necron Warrior! This was pretty fast and easy to do, and I'm very happy with the result. Despite using bright colors, they come across appropriately menacing, which is the goal.
The Characters
My characters tend to follow the same process, with some minor variations and more complicated schemes. 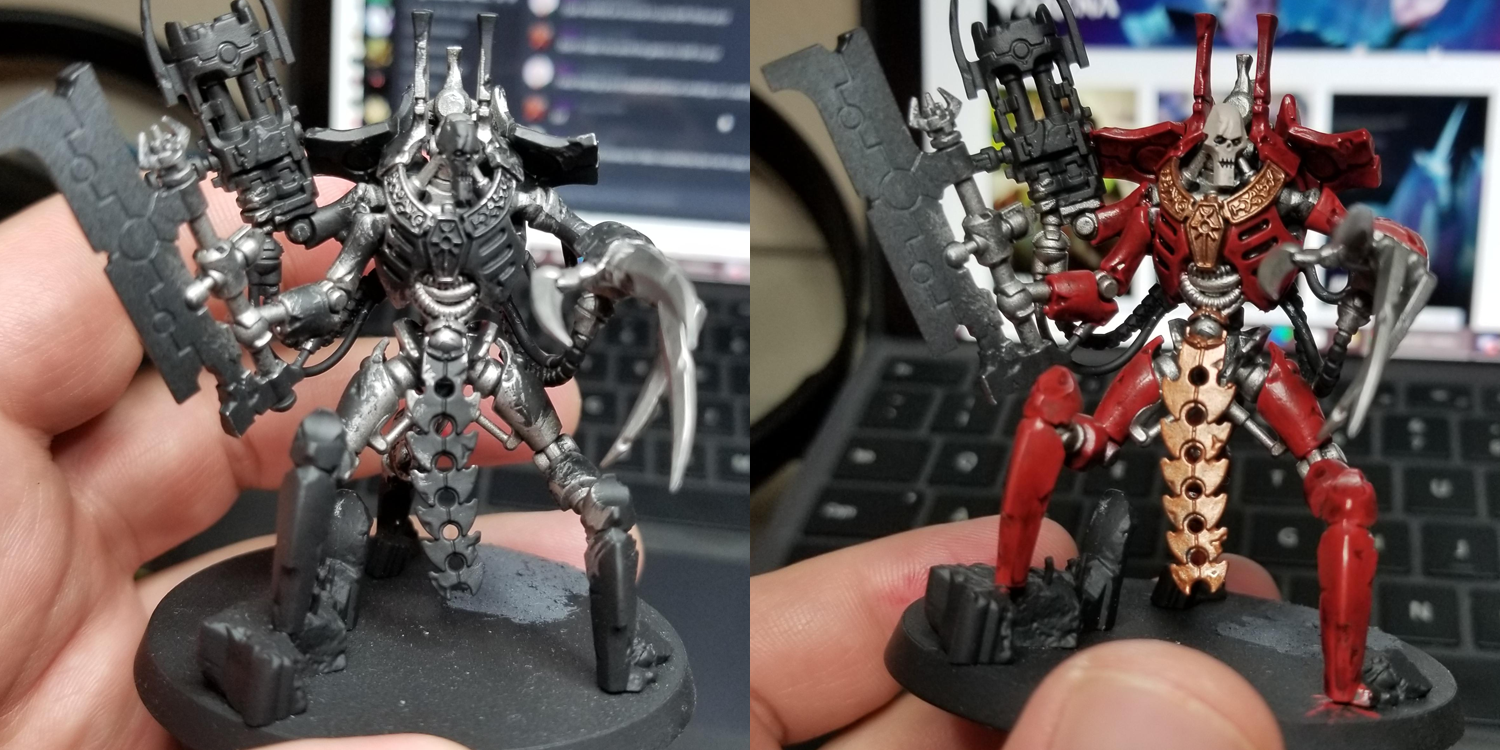 For these characters, the process is largely the same to begin – I cover the metal parts with Leadbelcher, but then they get significantly more red armor, where it will cover all of their non-joint areas. For the top leaders I'm also doing bone-colored skulls. When I do these, I start by painting them withRakarth Flesh, then I wash them withAgrax Earthshade. I come back and highlight them with Rakarth Flesh and edge highlight them withReaper Polished Bone. I'll also mix a little Agrax with Rakarth Flesh to do some wet blinds on the sides and tops of the skulls to get a smoother transition from brown to bone.
The other major difference between my characters and my rank-and-file jerks is that my character Necrons have orange hyperphase weapons. These took a bit of trial-and-error to figure out before I got a process for doing them that wasn't particularly hateful. 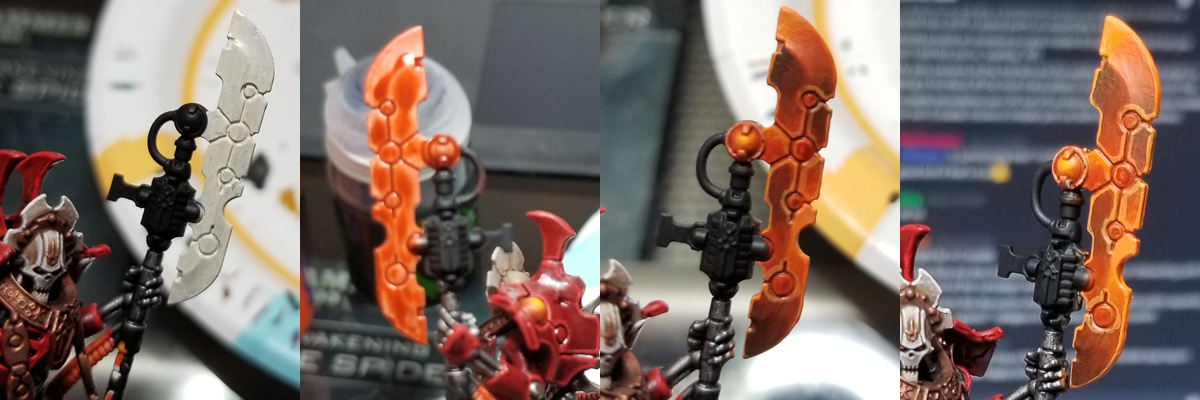 So I started by painting the blade withWraithbone,then coating that inContrast Gryph-Hound Orange.I didn't love how that looked though so I ended up doing a few solid coats ofTrollslayer Orangeover that, and on later blades I just started with Trollslayer, which gave me a better effect. Next I shaded parts of the blade withNuln Oilto create some obvious darker parts of the blade, doing the old standard "opposite lighting patterns" that frequently gets used on power weapons. Doing this in several layers and blending with Trollslayer gives you a brownish blade, so after that I started using thin coats ofContrast Gryph-Hound Orange,mixing it with Trollslayer, to coat the gradient parts and add saturation, giving a deeper orange hue. I shaded up a bit towardFire Dragon Brightand used Fire Dragon to edge highlight the blade. I've done this a few different ways now and I think starting with Wraithbone is probably the right call, and I'm getting to where it doesn't take hours to do, which helps a lot.
Overall I'm very happy with the Necron lads I've finished up to this point, and I'm eager to paint the rest of the box!
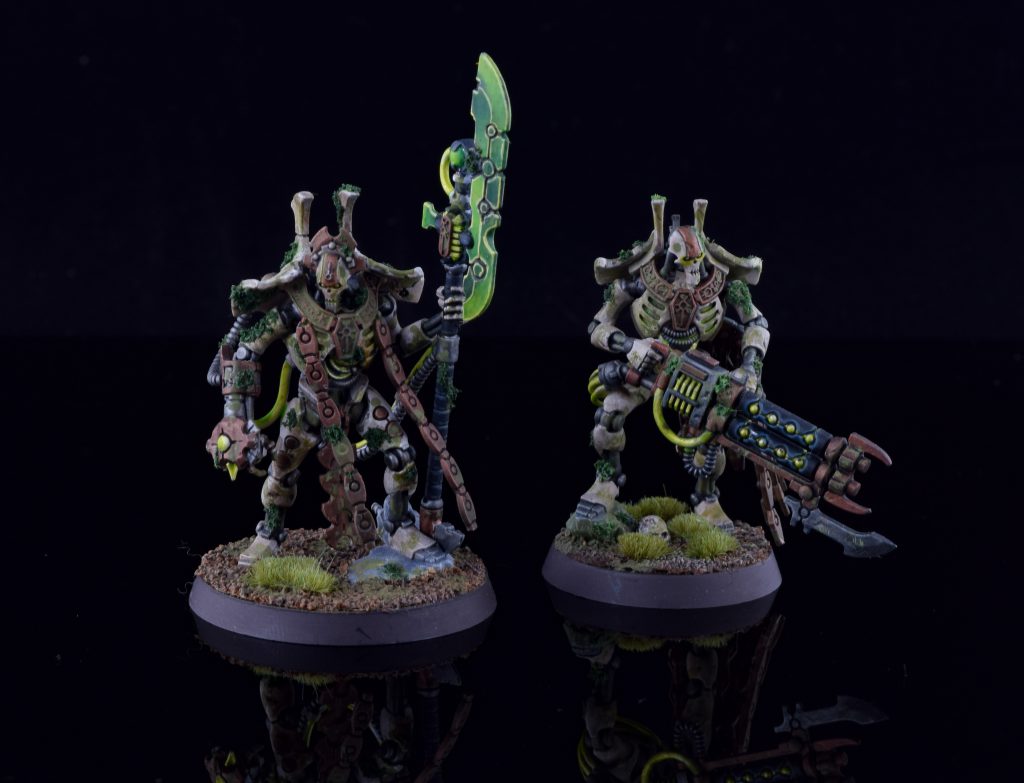
Craig "MasterSlowPoke" Sniffen's Sarnekh Dynasty
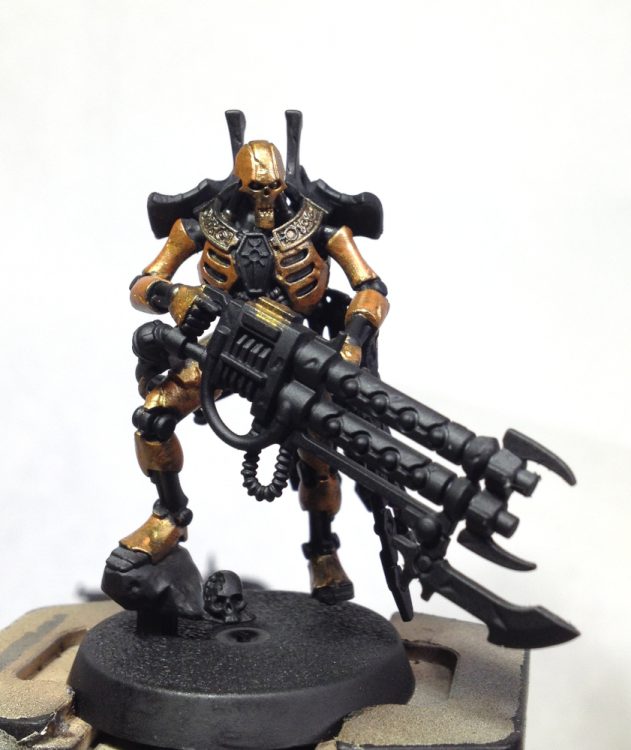
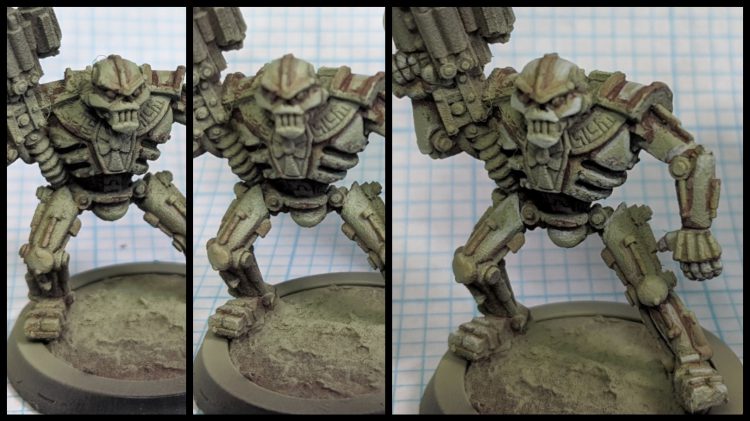
Necrons were my first real passion army for 40k. I got incredibly lucky and picked up a massive amount of the goofy-yet-amazing 2nd edition metals for an absolute steal about 2 weeks before the first leaks dropped in 5th edition. I gave a lot of thought to the color scheme I wanted to go with, and ended up deciding on one based around the old Rotting Flesh color. It's a sickly pale yellow-green that I felt was perfect to represent the slow degradation of a once beautiful ceramic casing – kind of like an old Super Nintendo. Unfortunately, Citadel switched out their paints a couple years after I started my Necrons, and there really was no replacement color for it. I had a good amount of Rotting Flesh left, but that's long since dried up and I've moved onto other projects.
-Phaeron Thaszar the Invincible of the Sarnekh Dynasty , addressing Lord General Hausmann during the Hadrima Summit
I've definitely caught Necron fever again with the upcoming Psychic Awakening: Pariah book, along with the massive amounts of new and improved Necrons looming over the new edition. With that in mind, I've updated my Necron scheme for the "new" GW paints and my improved quality of a painter. Two quick apologies – the model I chose to test with either has a really rough finish on the casting, or I really screwed up when I primed it about 6 years ago, and a couple of the minor photos here are pretty blurry. This is my first time doing an in-depth guide so I'll watch out for that in the future. 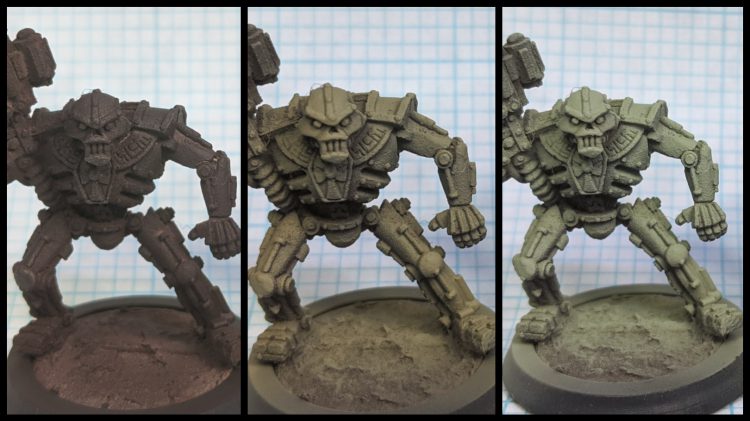
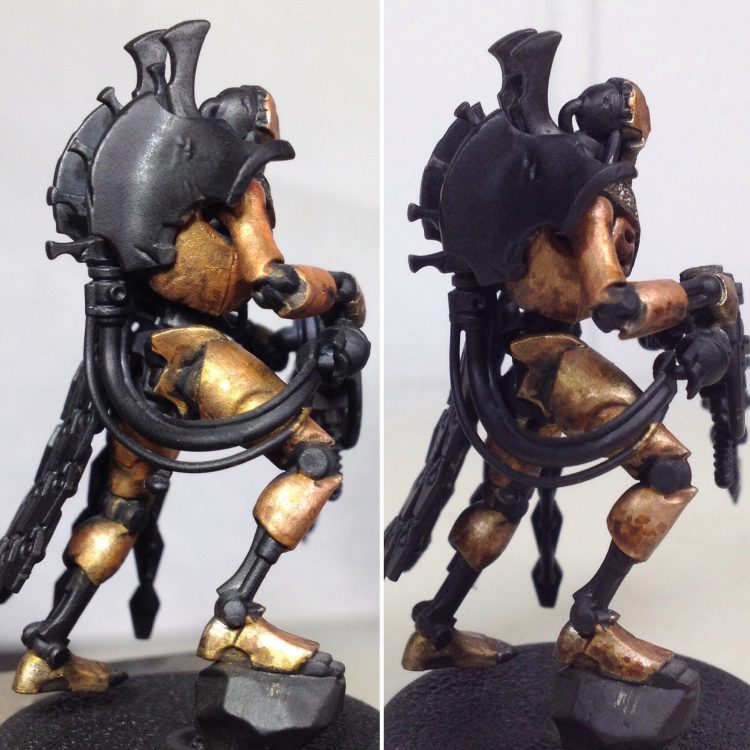
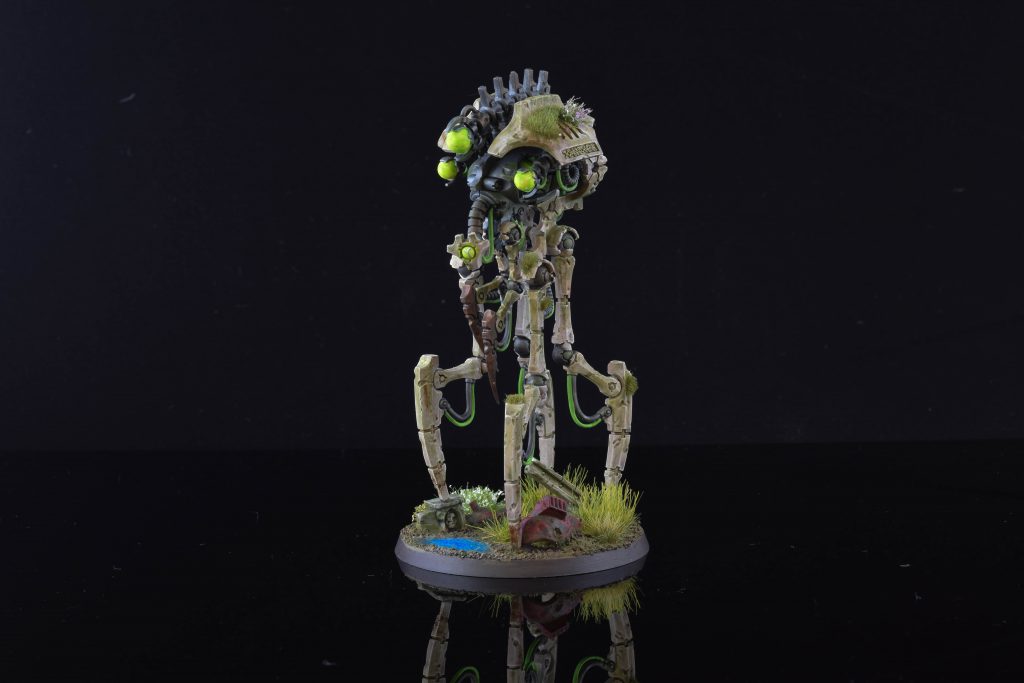
- Using an airbrush, cover the entire primed model with Citadel Rhinox Hide.
- Next, zenithally airbrush on Citadel Zandri Dust at about a 60 degree angle. You're looking to keep the Rhinox Hide in the underside and crevices of the model.
- Finally, zenithally airbrush on Citadel Nurgling Green at about a 45 degree angle. I'm not super great at keeping the Zandri dust visible, but you should aim to keep some of it in the middle to get a good gradient.

- Next, we begin shading it down. Go through glazes of Citadel Zandri Dust to bring back a little of the midtones. Mix in progressively more Citadel Rhinox Hide as you establish the shadows. Finally, a pin wash of Citadel Nuln Oil is good in the deepest recesses.
- We will then start the highlights. Glaze on some Citadel Nurgling Green to set where the brighter parts of the model should be.
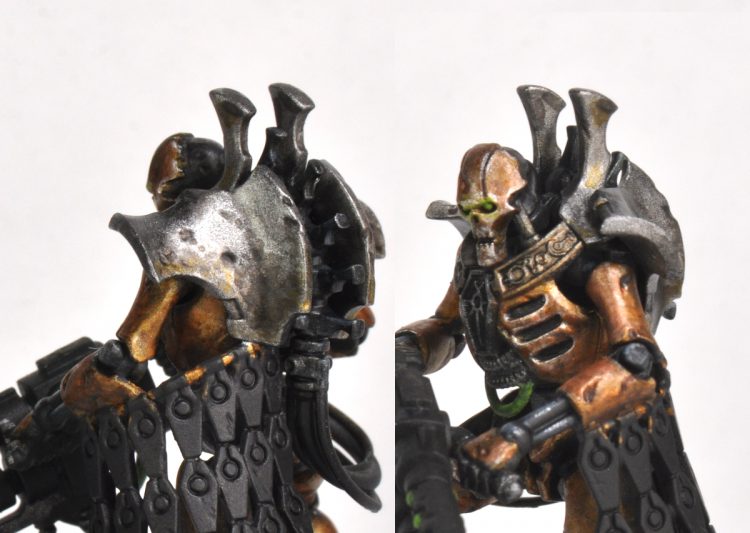
- Continually add Citadel Deepkin Flesh into the glaze to further brighten up the ceramic.
- Edge highlight with pure Citadel Deepkin Flesh. On character models you can go even further, and add in a little Citadel White Scar to the Deepkin Flesh to do reflex highlights.
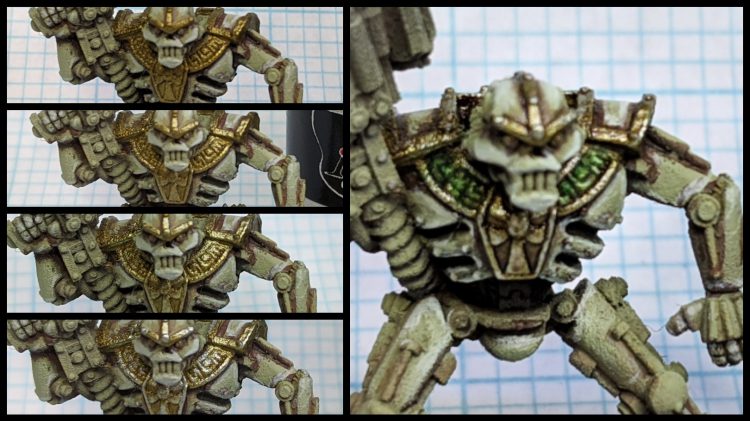
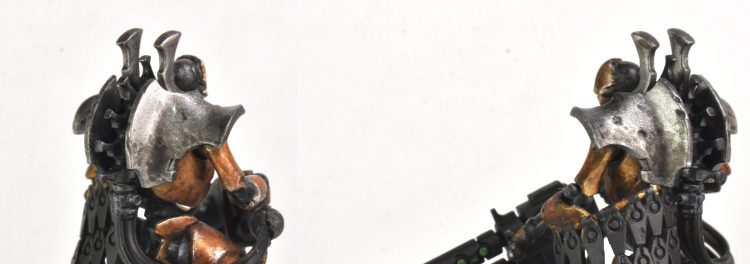
- Now we'll tackle the gold. I want it to be a tarnished and uncared for gold, so we'll basecoat with Scale 75 Necro Gold.
- Next, establish the midtones with a mix of 50/50 Scales 75 Necro Gold and Peridot Alchemy.
- Use pure Scale 75 Peridot Alchemy as an edge highlight. For reflex highlights, mix in a little bit of Scale 75 Speed Metal or White Alchemy
- Finally, use Citadel Agrax Earthshade Gloss to establish the shadows. For the green part in the middle of the Necron's necklace thing, I carefully washed over the gold with Citadel Biel-Tan Green
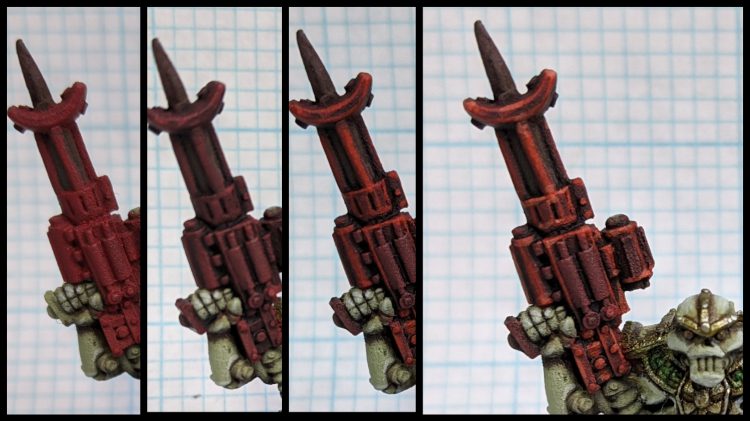
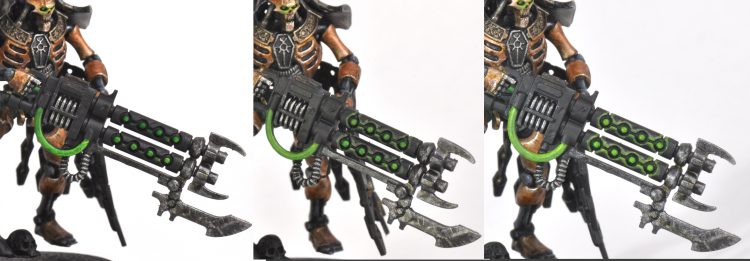
- 2nd edition models deserve bright red weapon casings! Considering the age of this model, basecoat the area with my everlasting pot of Citadel Mechrite Red. If you don't live in 2009, I think that Khorne Red is a decent substitute.
- Wash over the entire weapon with Citadel Nuln Oil.
- Edge highlight everything with Citadel Evil Suns Scarlet.
- Do a final reflex highlight with Citadel Wild Rider Red. We didn't break any new ground with this red recipe, but I've always thought it looked great.
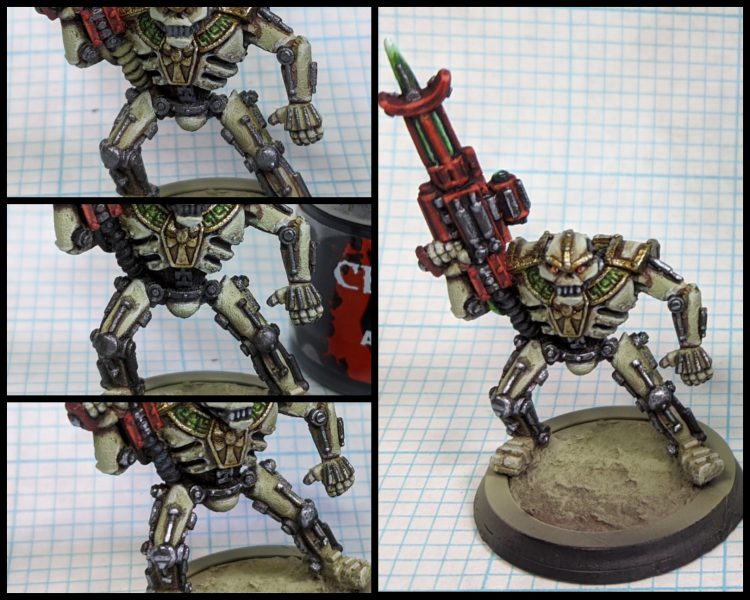
- Everything will start to come together when we do the silver metals. Basecoat them with Scale 75 Black Metal.
- Wash all the silvers with Citadel Nuln Oil. While we're at this, basecoat the corrugated tube thing with Citadel Abaddon Black.
- Establish the highlights on the silvers with Scale 75 Heavy Metal. For the tube, edge highlight it with Citadel Thunderhawk Blue.
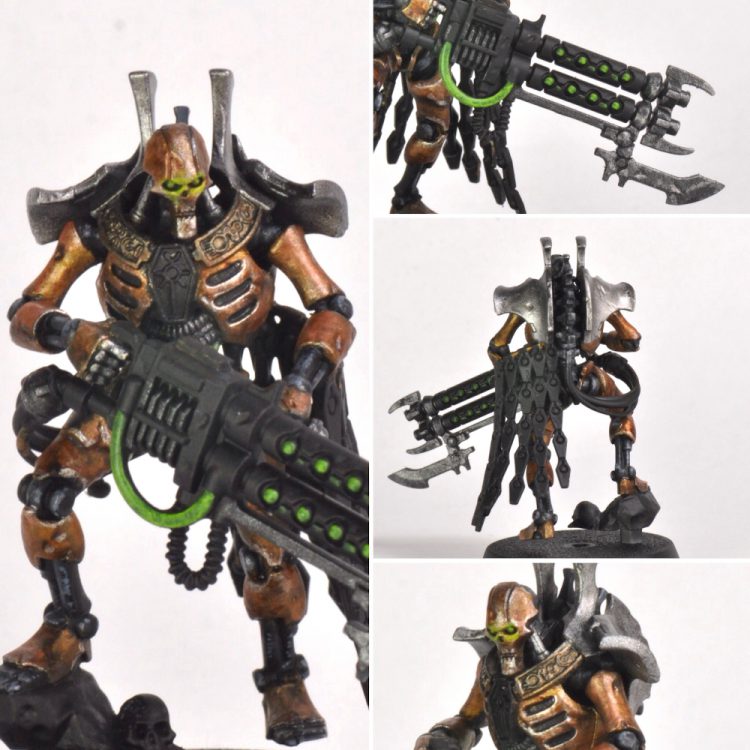
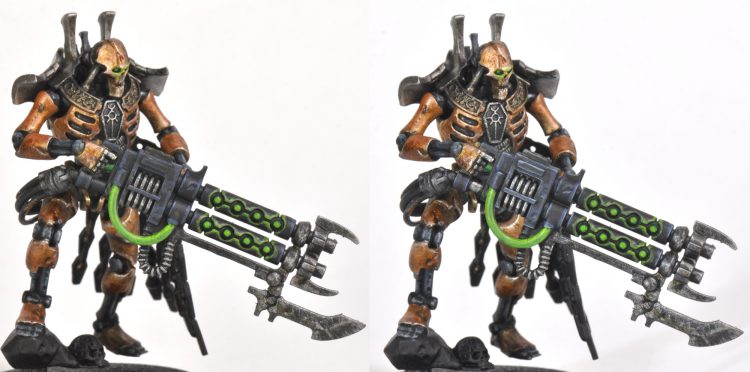
Finally, paint in the lenses and the Gauss energy. For the red lenses, just use the color progression we used for the gun casing. For the Guass energy and green lenses, basecoat the areas with Citadel Caliban Green, then glaze in progressive amounts of Warpstone Glow, Moot Green, and Gauss Blaster Green. " data-medium-file="https://d1w82usnq70pt2.cloudfront.net/wp-content/uploads/2020/05/1000748-01-750x750.jpeg" data-large-file="https://d1w82usnq70pt2.cloudfront.net/wp-content/uploads/2020/05/1000748-01-1024x1024.jpeg" src="https://d1w82usnq70pt2.cloudfront.net/wp-content/uploads/2020/05/1000748-01-750x750.jpeg" data-src="https://d1w82usnq70pt2.cloudfront.net/wp-content/uploads/2020/05/1000748-01-750x750.jpeg" alt="" width="750" height="750" data-srcset="https://d1w82usnq70pt2.cloudfront.net/wp-content/uploads/2020/05/1000748-01-750x750.jpeg 750w, https://d1w82usnq70pt2.cloudfront.net/wp-content/uploads/2020/05/1000748-01-150x150.jpeg 150w, https://d1w82usnq70pt2.cloudfront.net/wp-content/uploads/2020/05/1000748-01-768x768.jpeg 768w, https://d1w82usnq70pt2.cloudfront.net/wp-content/uploads/2020/05/1000748-01-1024x1024.jpeg 1024w, https://d1w82usnq70pt2.cloudfront.net/wp-content/uploads/2020/05/1000748-01-1080x1080.jpeg 1080w" data-sizes="(max-width: 750px) 100vw, 750px" srcset="https://d1w82usnq70pt2.cloudfront.net/wp-content/uploads/2020/05/1000748-01-750x750.jpeg 750w, https://d1w82usnq70pt2.cloudfront.net/wp-content/uploads/2020/05/1000748-01-150x150.jpeg 150w, https://d1w82usnq70pt2.cloudfront.net/wp-content/uploads/2020/05/1000748-01-768x768.jpeg 768w, https://d1w82usnq70pt2.cloudfront.net/wp-content/uploads/2020/05/1000748-01-1024x1024.jpeg 1024w, https://d1w82usnq70pt2.cloudfront.net/wp-content/uploads/2020/05/1000748-01-1080x1080.jpeg 1080w">Finally, base the model and you are done! I like to put a little bit of rust pigments on the feet and other low hanging parts of my models to tie them in, but I think I went a little too heavy here. I'm definitely excited to see my Necrons on the table again soon. I've already begun planning how how I'm going to glow up my Thaszar the Invincible model to better match the cooler, edgier Necron models of 9th edition.
Corrode's Method
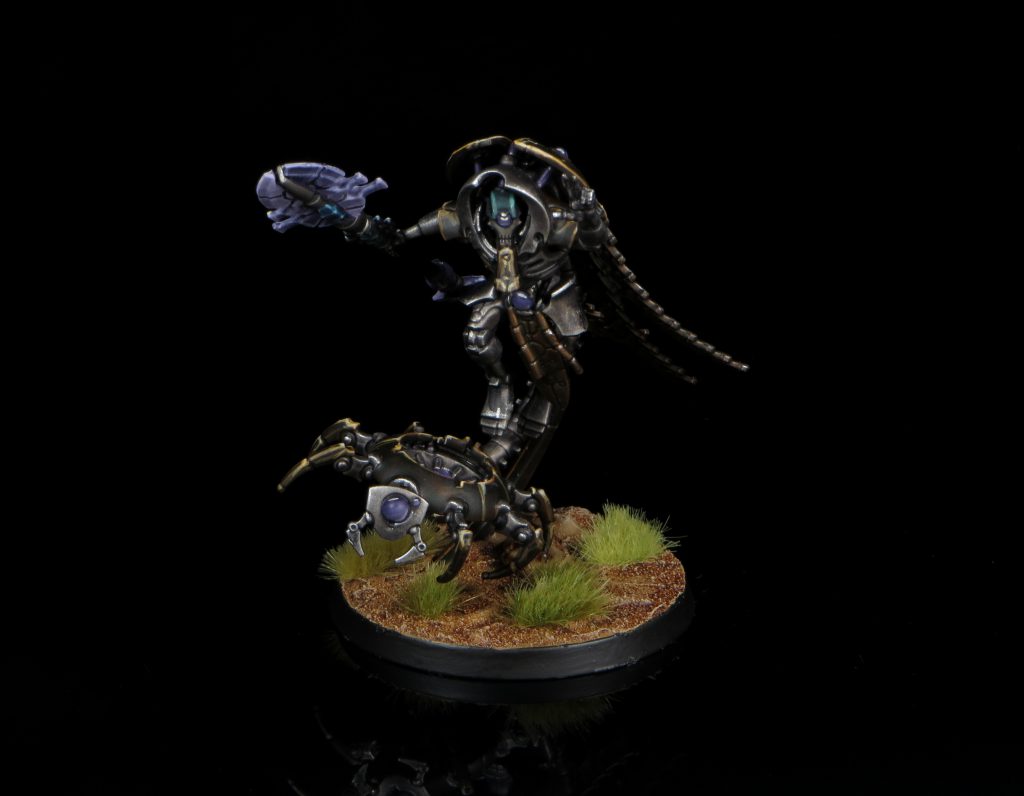
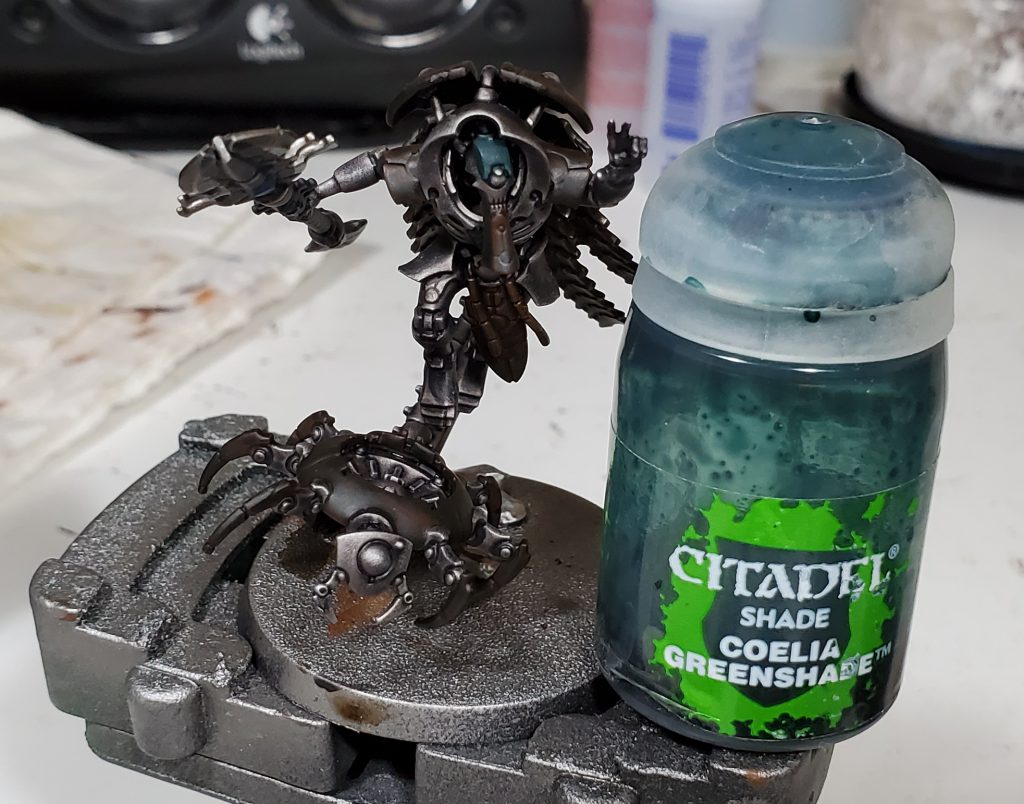
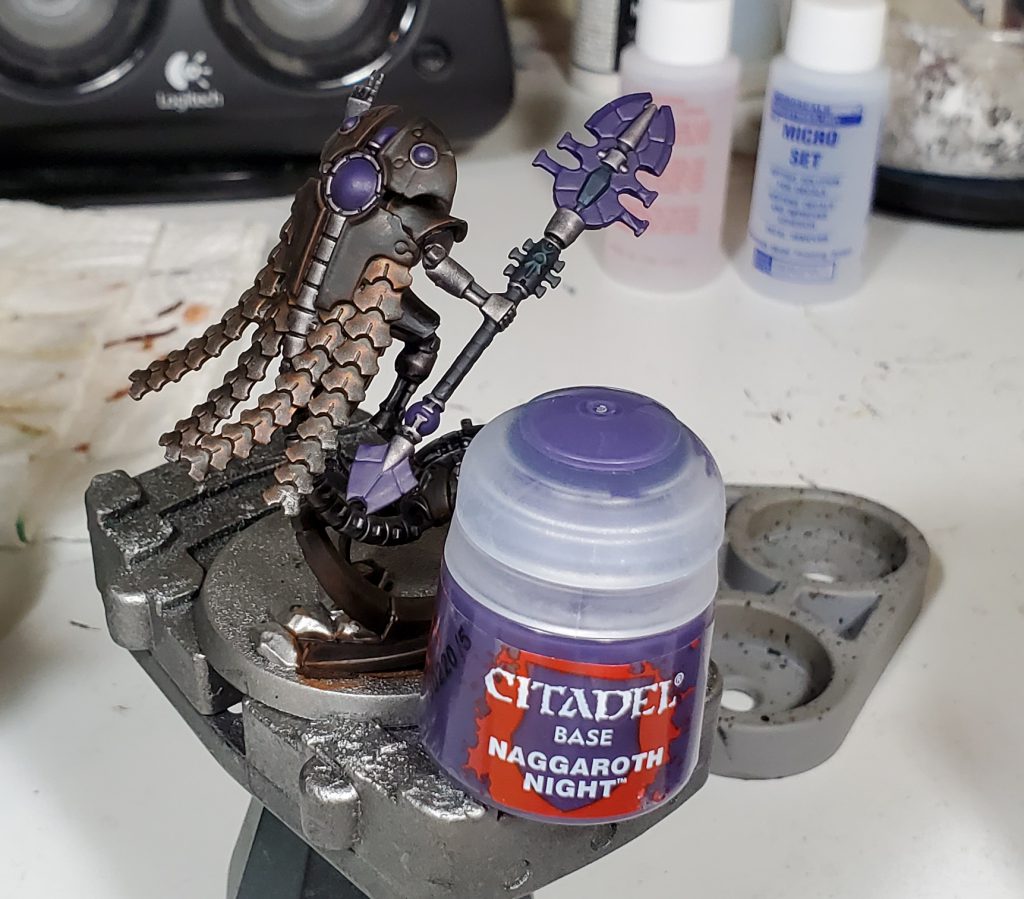
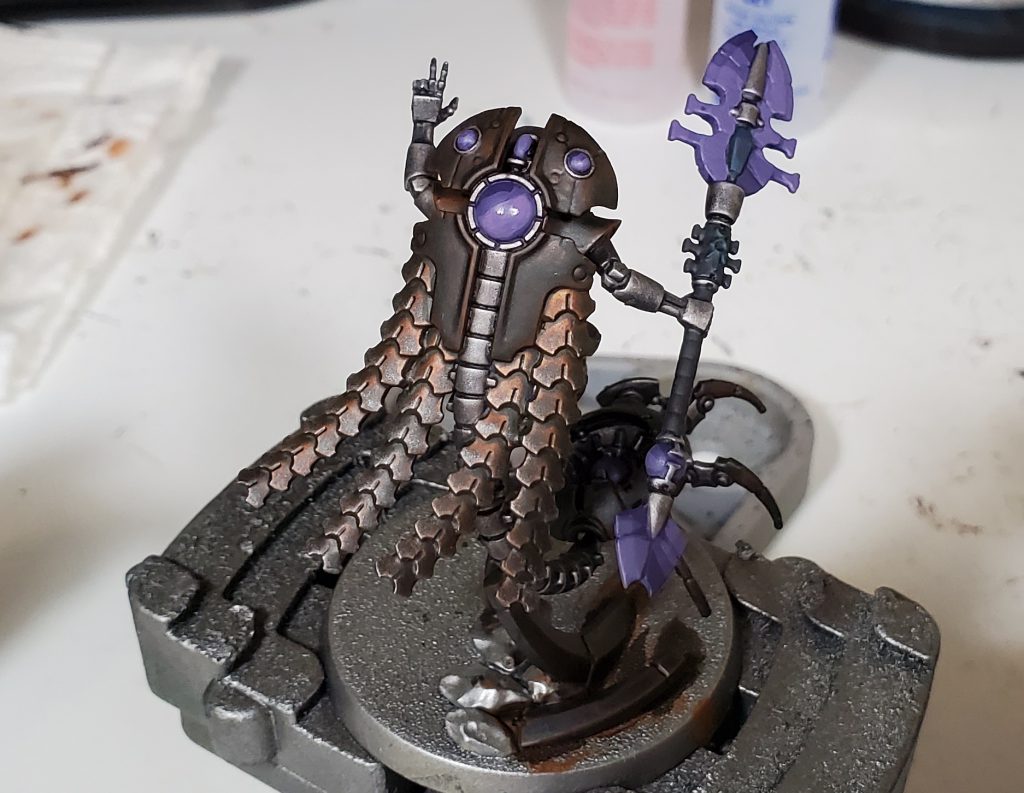
If you've read any Necron articles on Goonhammer at all, you've almost definitely seen this Overlord kicking around. He's shown up basically every time we've needed a picture of a Necron. I like this guy a lot, but my Necron army never got past the stage of being "fledgling" and was mostly painted two years ago, and I think now i would do them differently. The body is just Army Painter silver spray washed Nuln Oil, the carapace is Naggaroth Night then Xereus Purple highlighted with Genestealer Pink, and the green is Warpstone Glow -> Moot Green. The gold is just Retributor Gold washed Seraphim Sepia, and the brassy bits are Runelord Brass which I think was also washed Sepia.
If I end up picking the Necrons back up – maybe after all those sweet new models drop in the probable 9th edition starter – I would do asimilar procss, but add a little more – the gold would be Retributor -> Auric -> wash Druchii Violet -> Auric again, and instead of the somewhat anaemic looking Runelord Brass we have here I'd do Brass Scorpion and then Sycorax Bronze. I like the body well enough, but to give it a bit more depth I'd spray Leadbelcher and then drybrush Ironbreaker. I also need to update the bases using the method from our How to Base Everything: Deserts and Wastelands article. The green and purple can stay, though. I love purple and gold as a scheme – it also appears on my Imperial Knights – and I think that i executed the greens pretty well here.
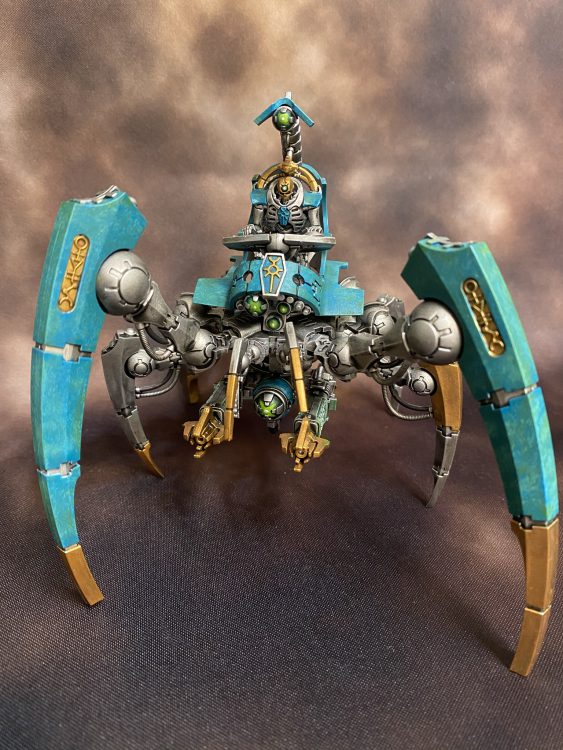
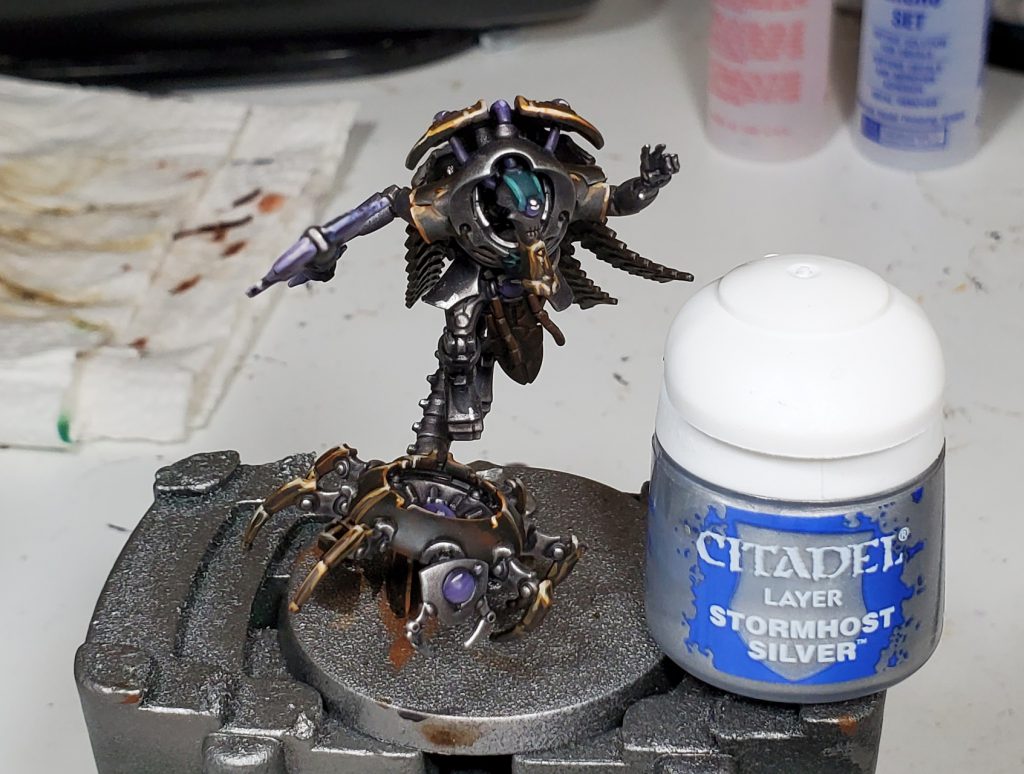
Rockfish
Necrons have always floated around as a army I was on the edge of getting into from when I got started in the hobby, but they never quite had enough stuff that looked really good to me and I used to hate painting metal. I ended up ordering a SC when Szeras was shown off, then when they unleashed the floodgates of new models I was caught up in the wave!
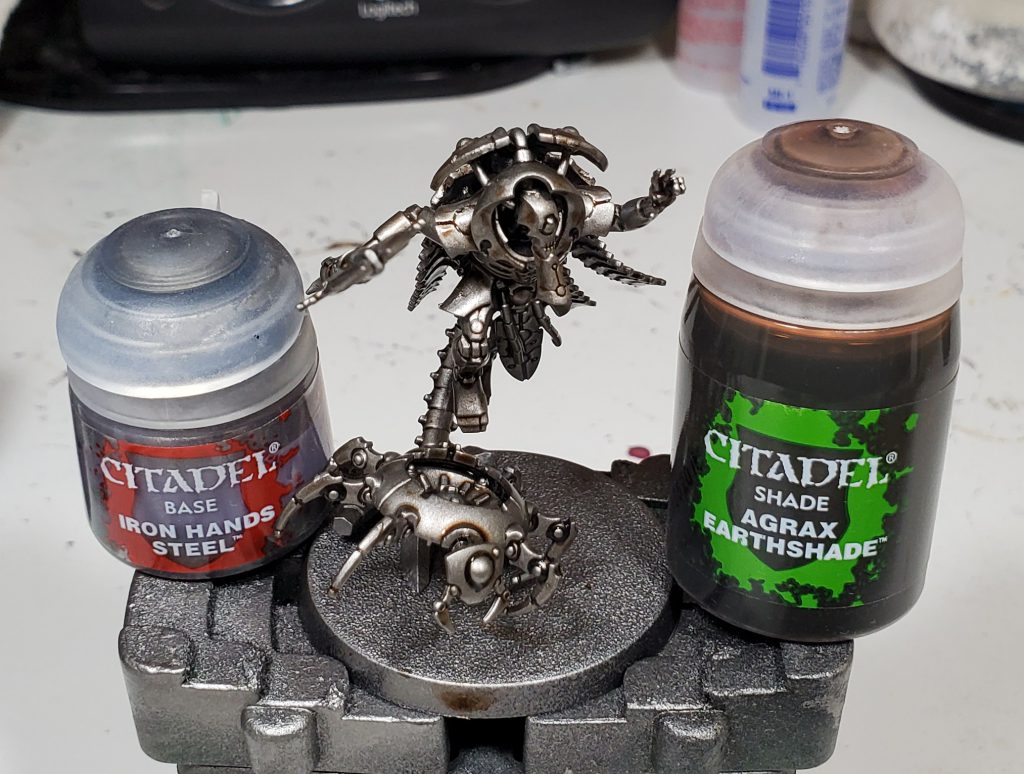
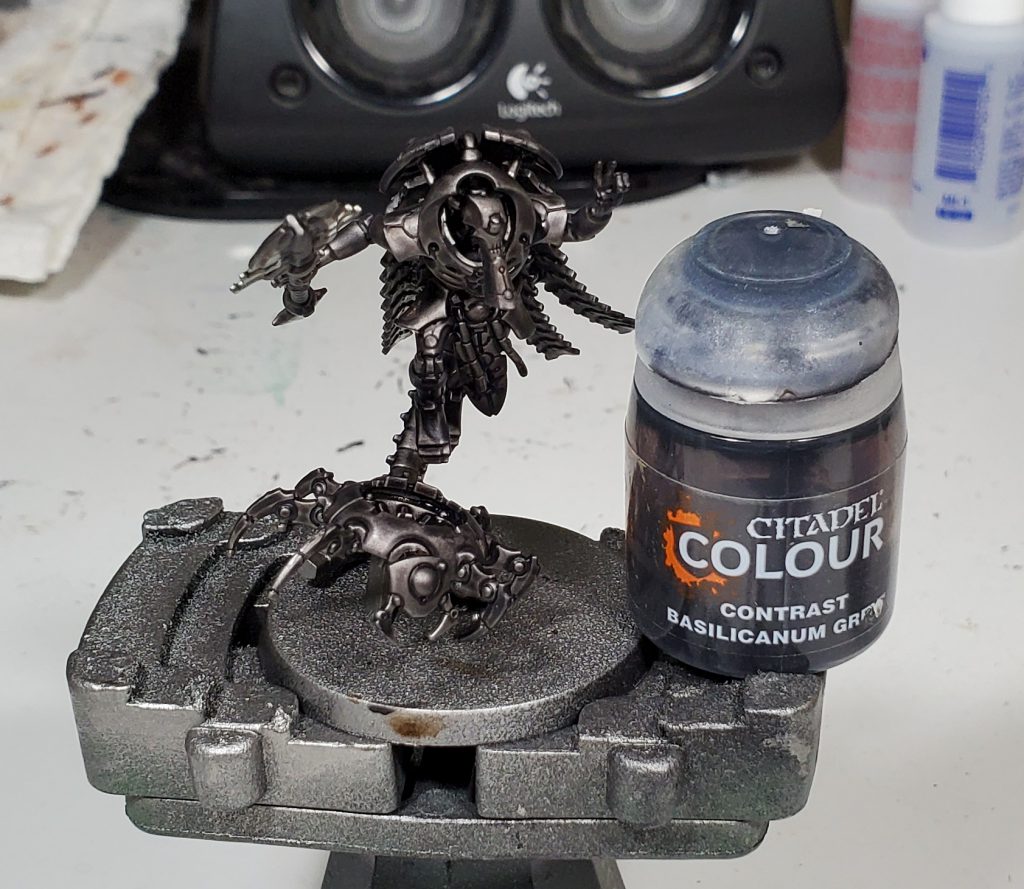
For my scheme all the metal is done in one go, these days I much prefer to just base coat one metallic colour and then just use washes and contrast to build up the colour I want. In this case I wanted a rich dense feel to the metal for which the density of basilicanum is just fantastic, its effectively multiple coats of nuln in one go! While it is not super obvious in the final product, the agrax helps to give complexity to the tones in the metal that the grey wash does not really give.
I will come back later to add a final edge highlight after the drybrush of ironbreaker, I often leave stuff like that to the end as it gives me a chance to clean up mistakes.


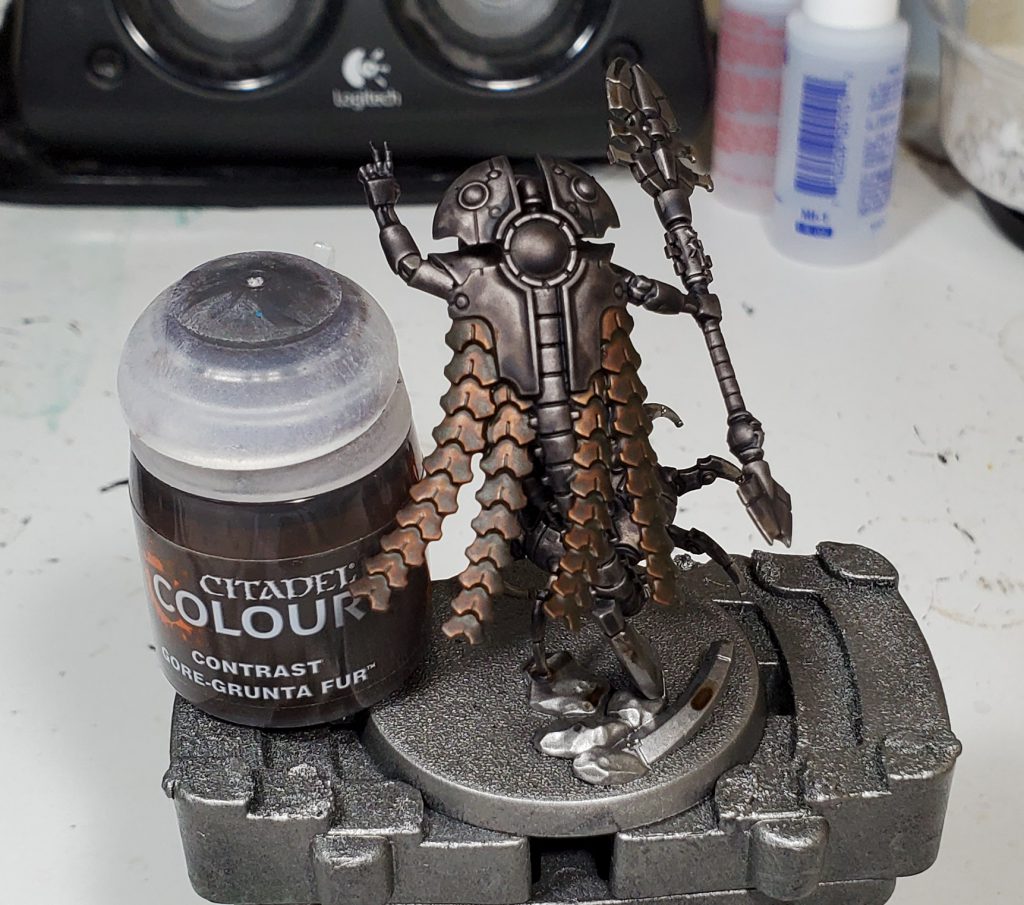
After the metal I went around to block in and wash the majority of the conventional colours, I left the blades and other stuff that will be purple until later as I was planning to mix colours and I don't want to waste paint.

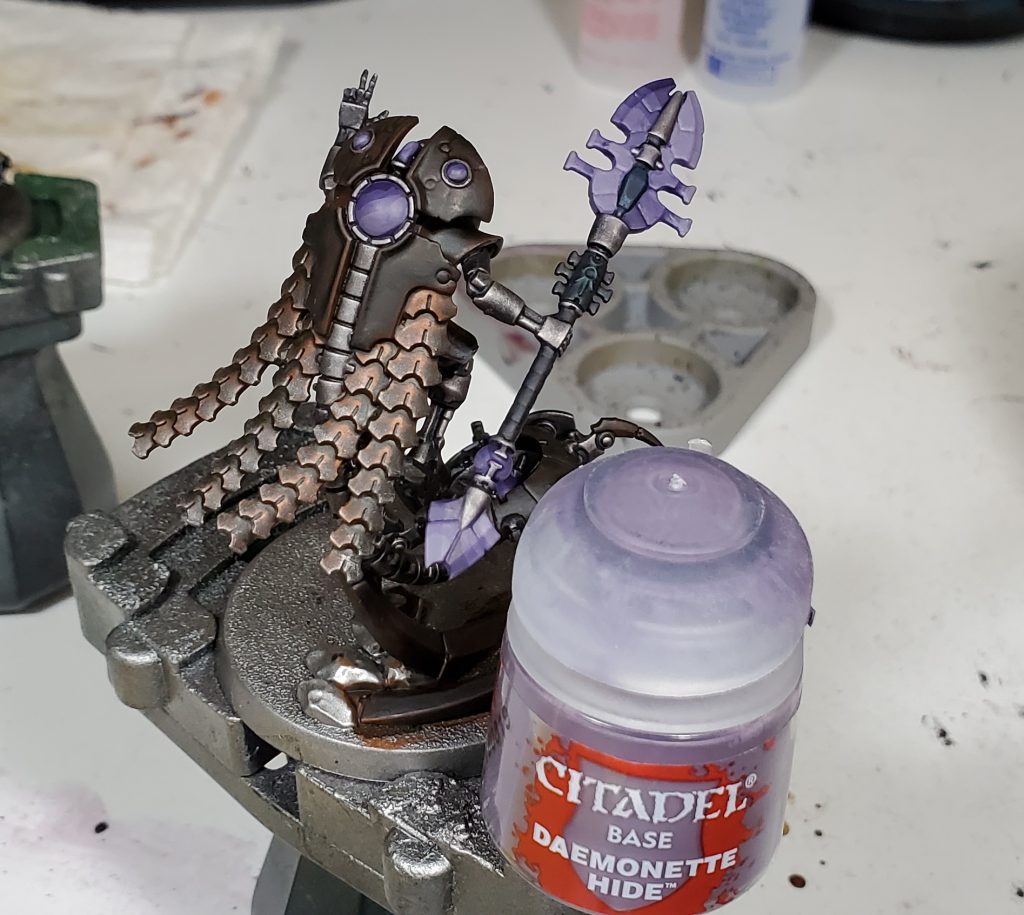

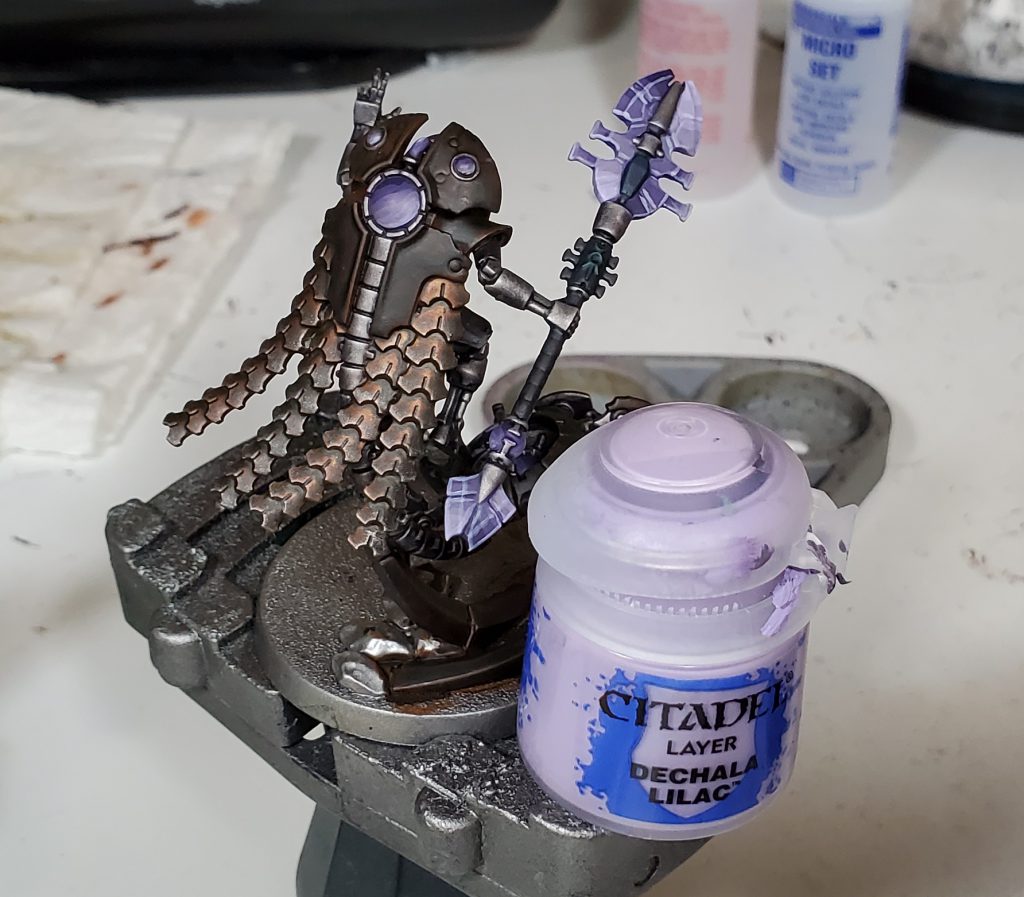
Honestly the technique I use for my purples could probably be done faster just by wet blending instead of mixing each colour together sequentially, but I am not very good at that at the moment! Plus, I am still pretty happy with how it comes out, particularly when these models have a ton of small gems, lenses, and blades.
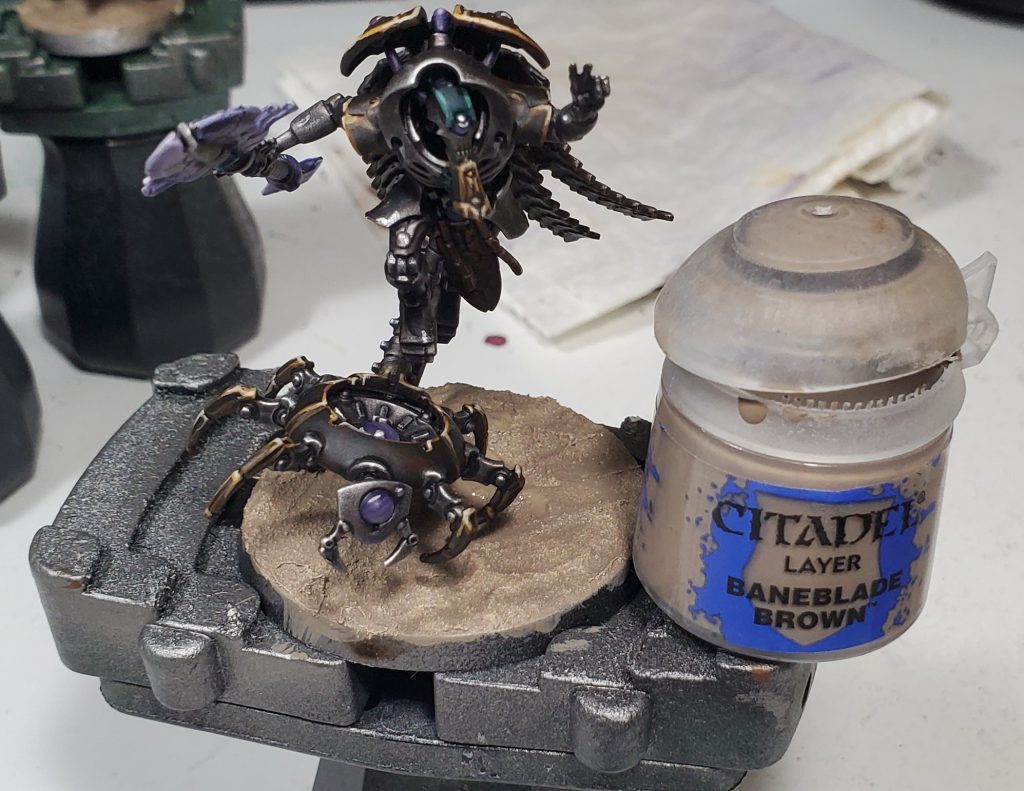
If you are looking to save time it's worth remembering with stuff like this that even basic layering like this blends together very well on the table top. Even in close up shots kind of gets smoothed out when you have sharp contrasts like the recess colours and edge highlights going on.

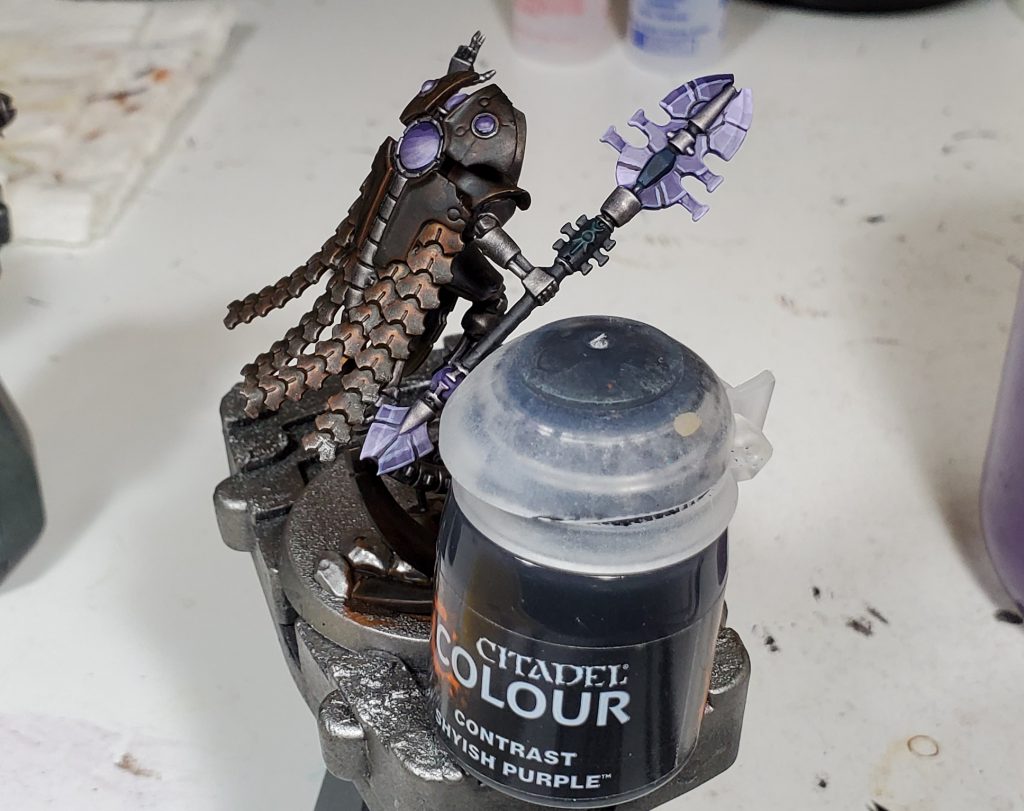
I often quite enjoy this step in a scheme, when the most time consuming parts are done and you get the opportunity to just do a flurry of small highlights all over the place and see lots of impact from little effort.
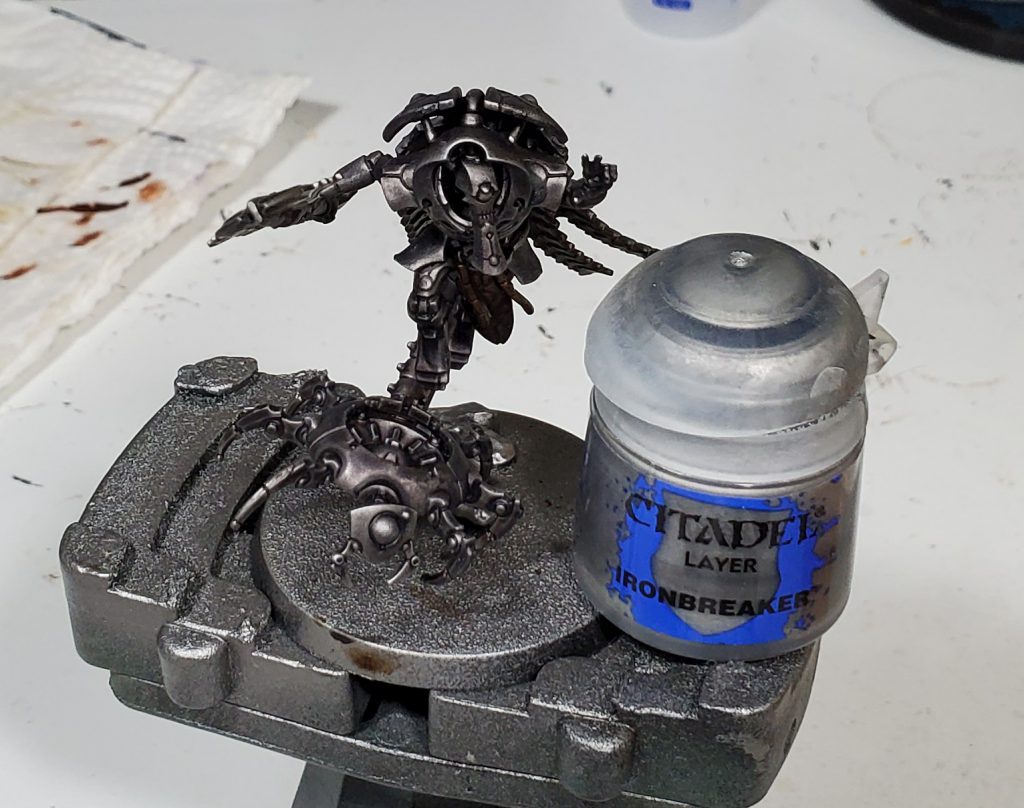
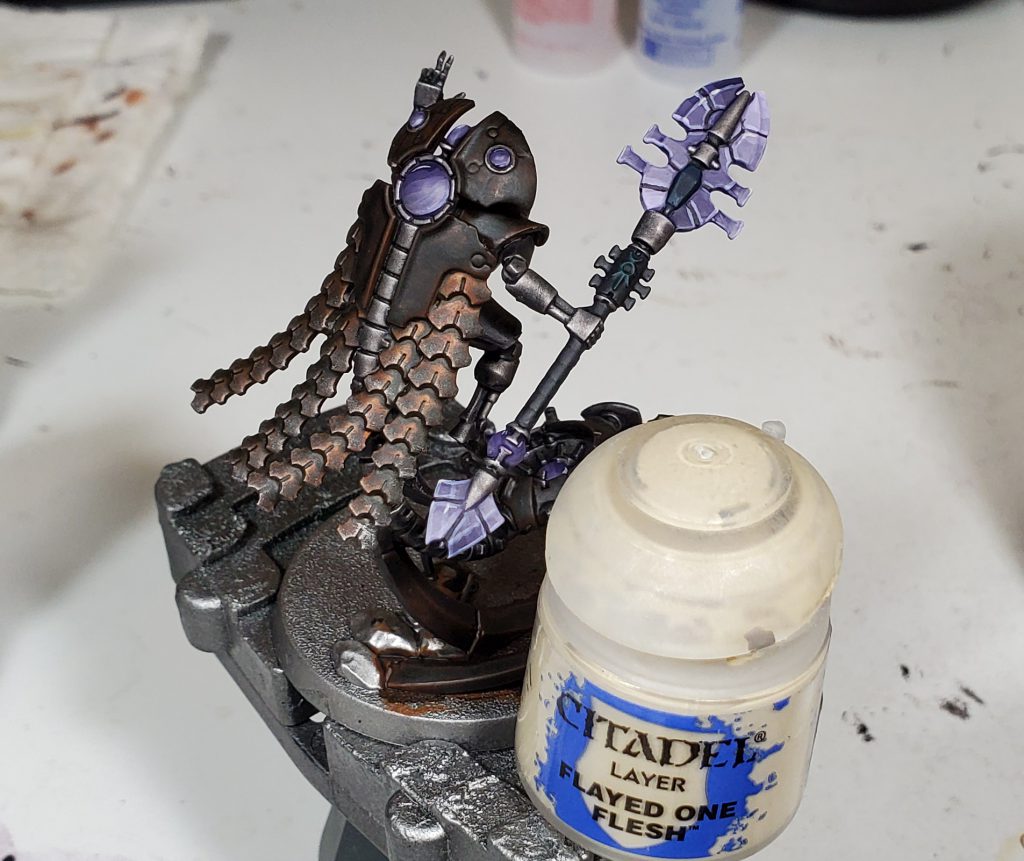
The final step on the necron themselves is to do the extreme edge highlights, I used a common colour for each of metallics and conventional paints to help tie them all together.
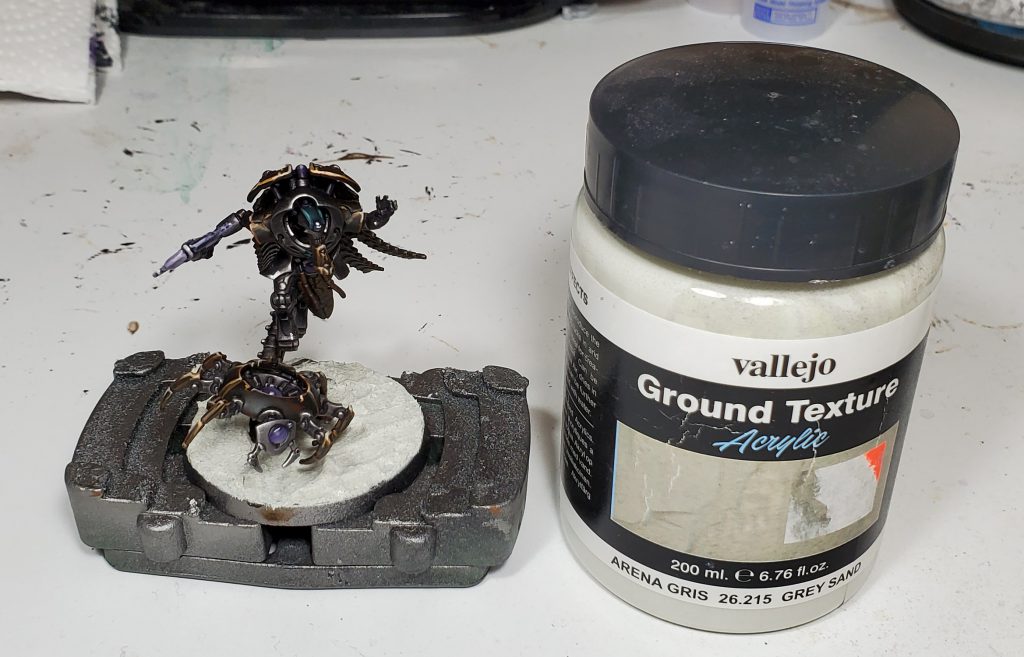

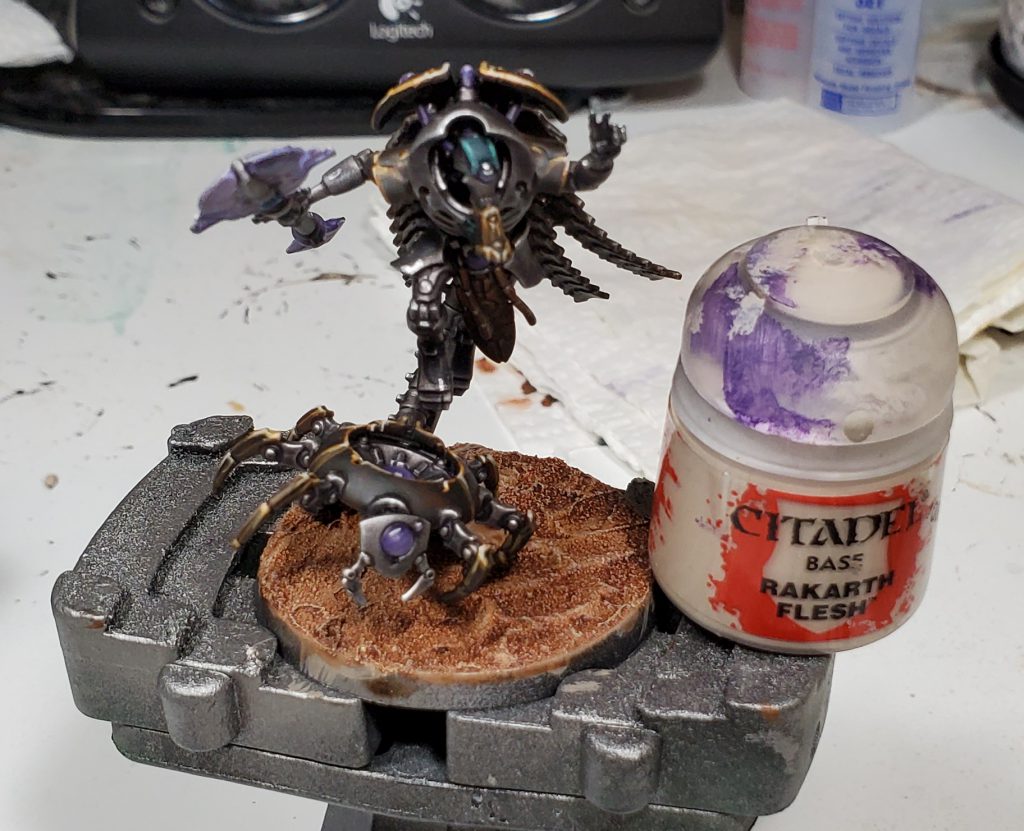
I use a relatively lightly coloured base to help have the dark necron pop out against it, be careful when doing stuff like that though as it is easy to have it overpower the model you are trying to showcase!
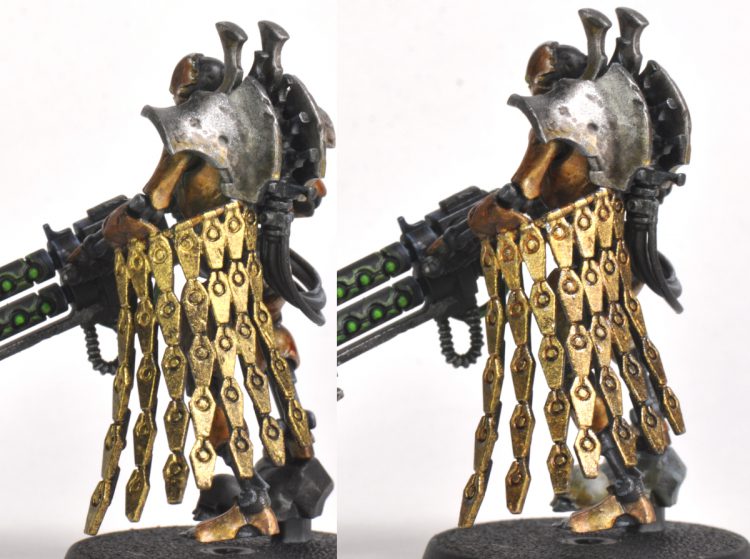
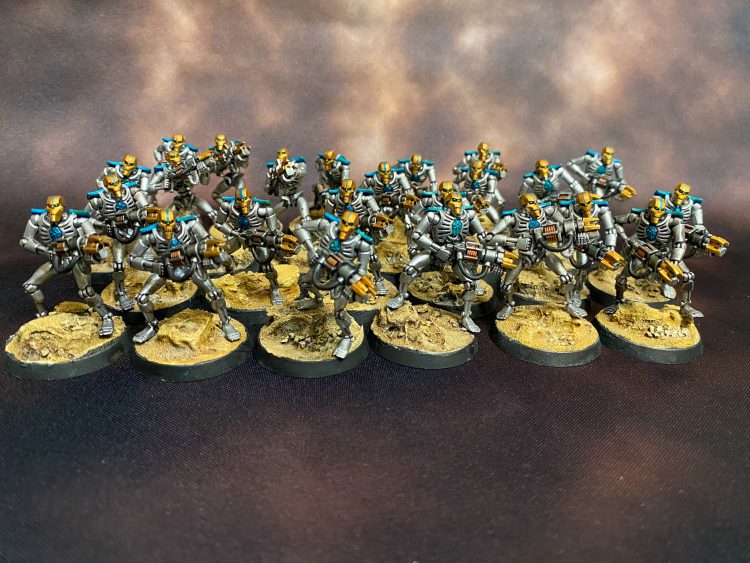
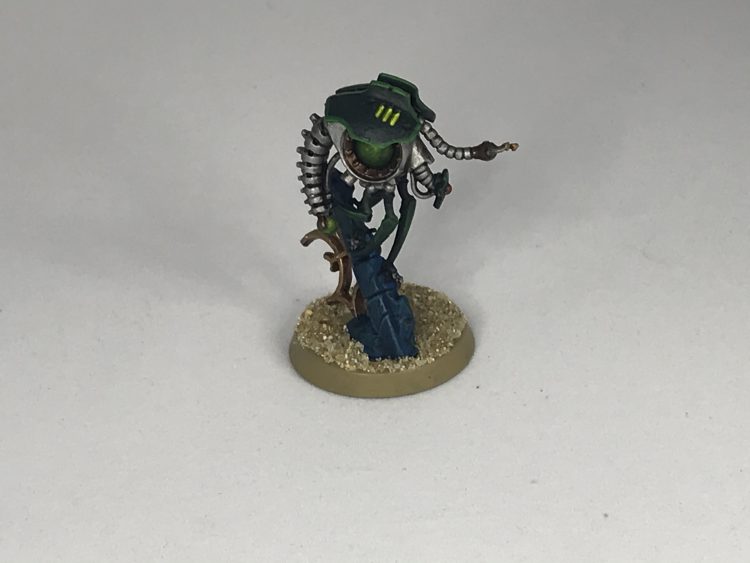
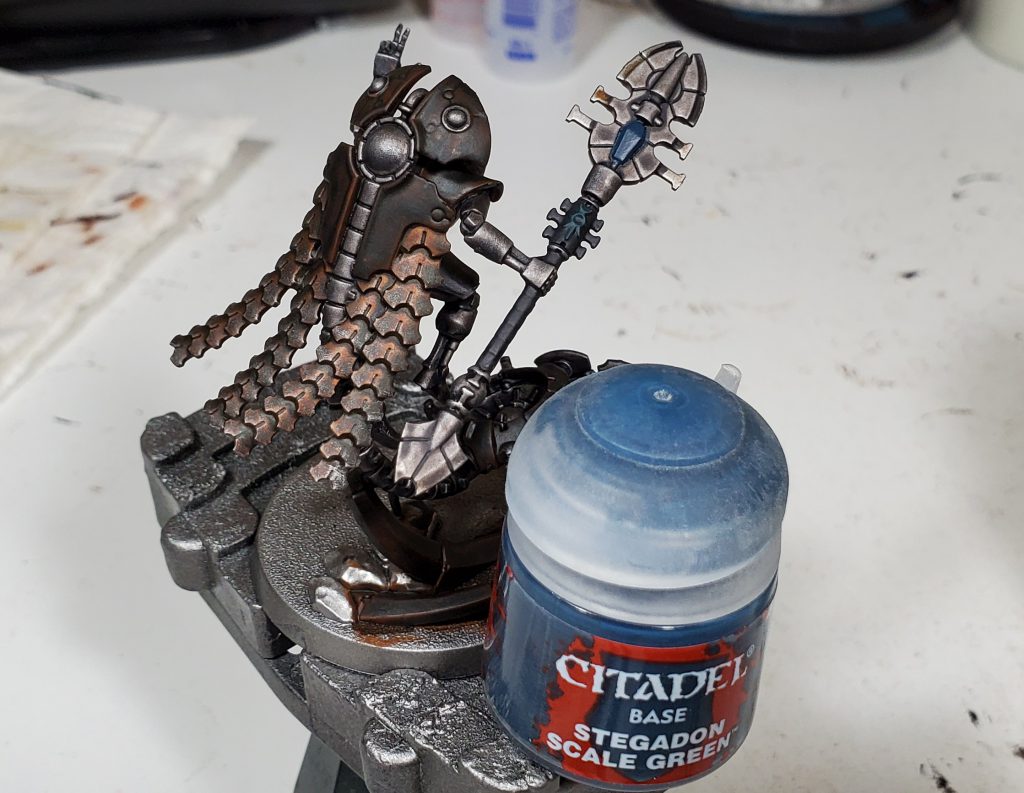
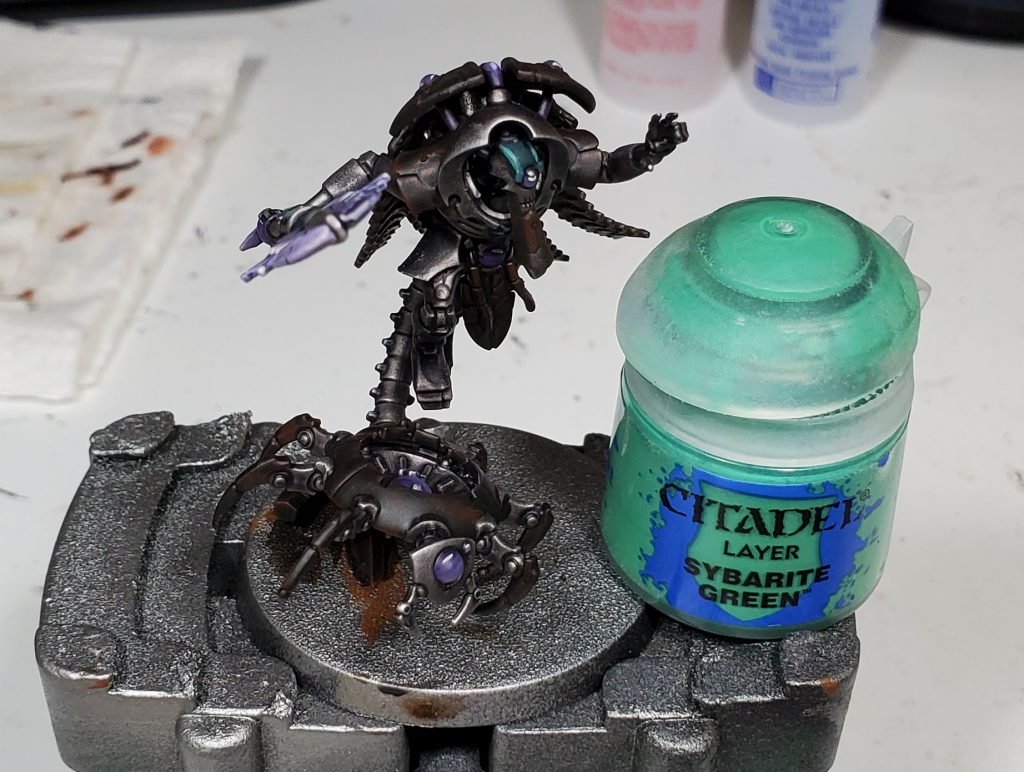
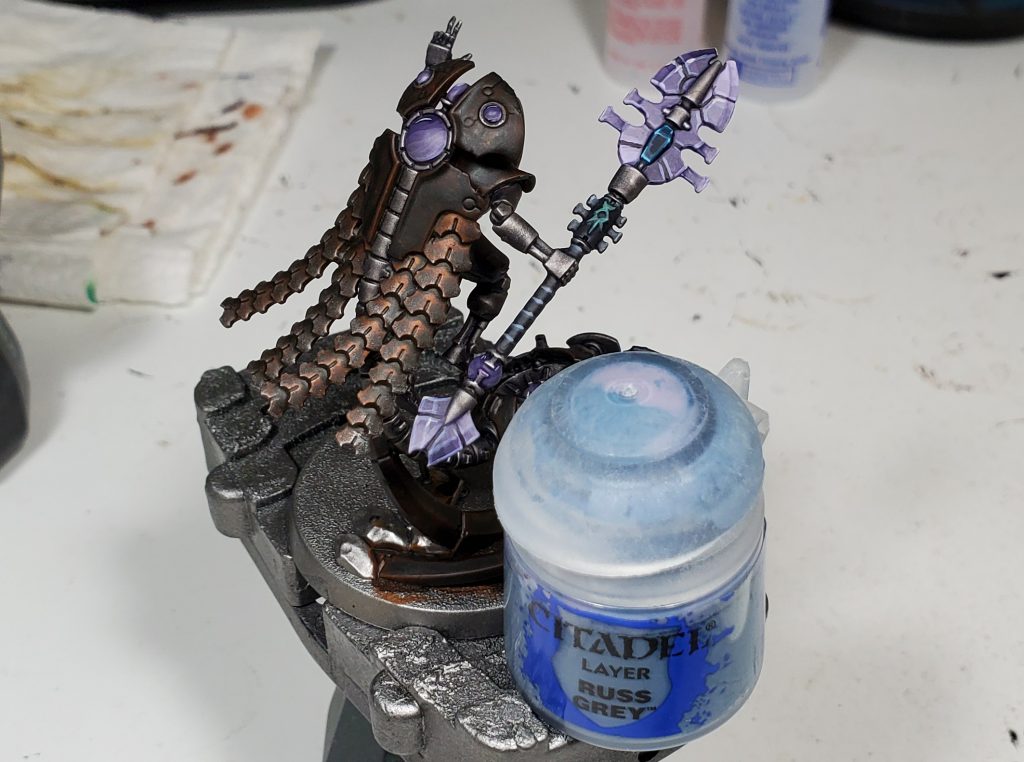
Thokt Dynasty – Skails' Method
I'm doing a take on the Thokt Dynasty, going with a largely blue and grey scheme.
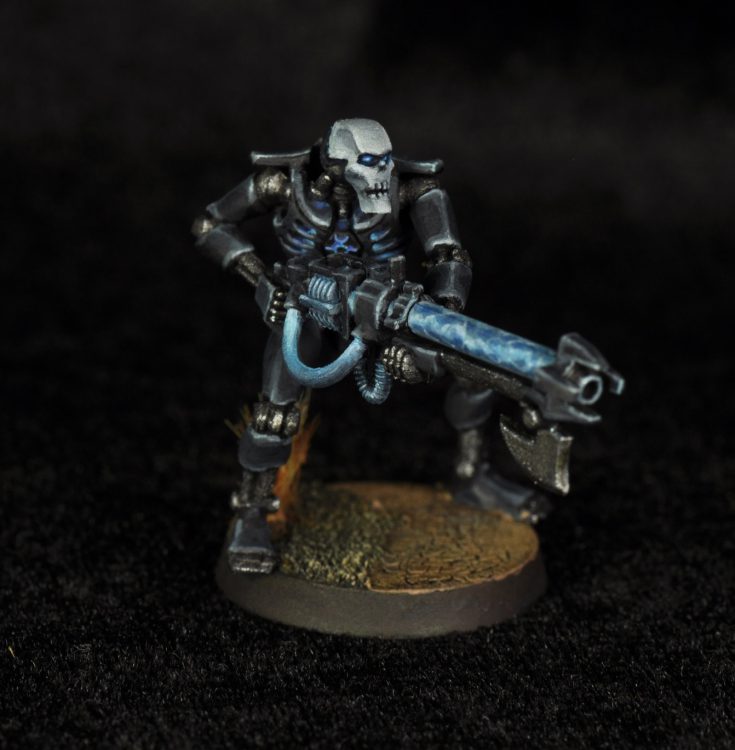 Paints used- GW: Leadbelcher, Temple Guard Blue, Nuln Oil Vallejo: Model Color Basalt Grey, Model Color Dark Prussian Blue, Game Color Stonewall Grey, Game Color Dead White, Game Color Ultramarine Blue Daler Rowney: Indigo Acrylic Ink Golden Acrylics: Satin Glazing Liquid
Metal: Base the metal bones bits with Leadbelcher and give that a wash with Nuln Oil 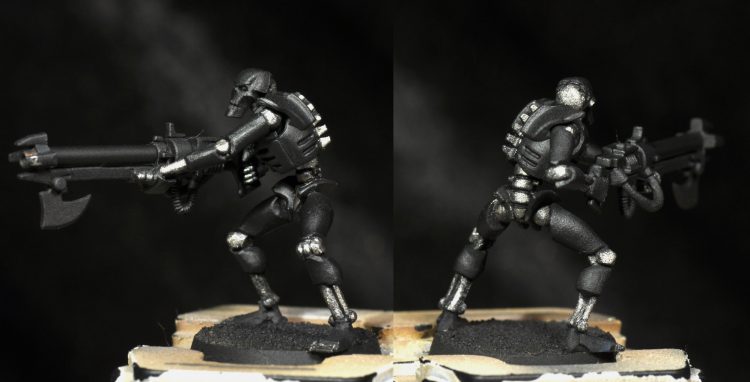
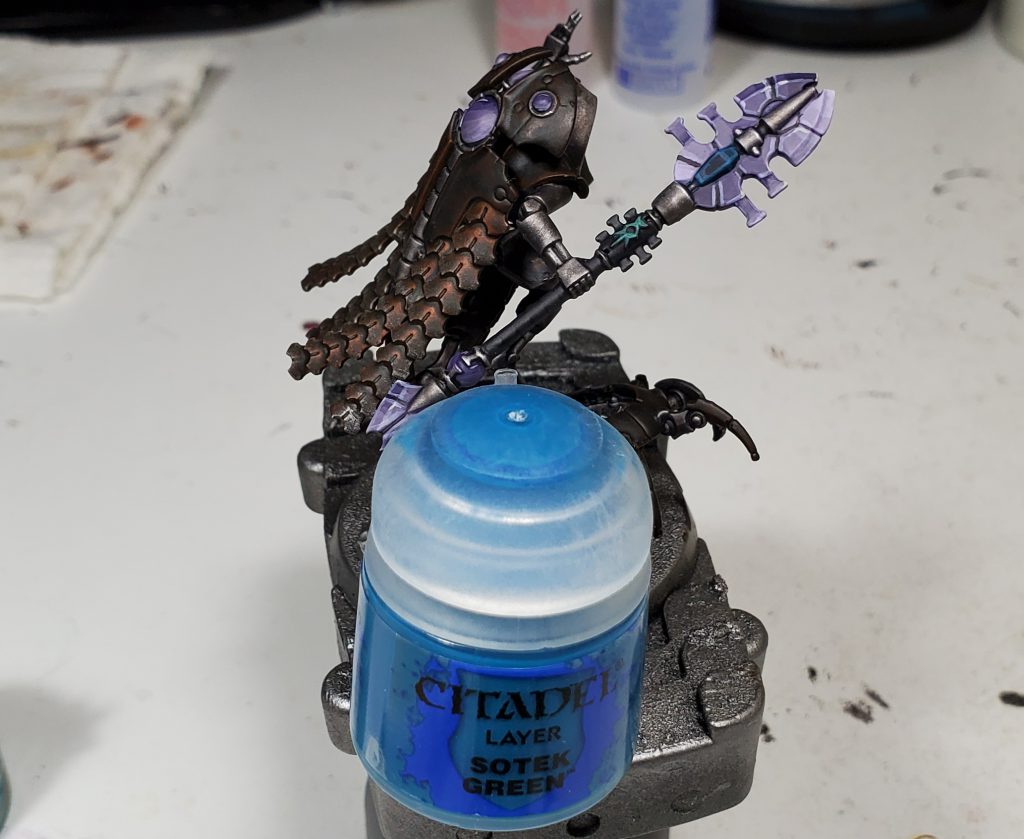
Base: The armor/carapace/face and gun housing were all based with a mix of German Grey with little bit of Dark Prussian Blue mixed in for a bit of tint- in the range of 10-20%. I don't think this is strictly necessary, how blue you want it (if at all) is up to personal taste. 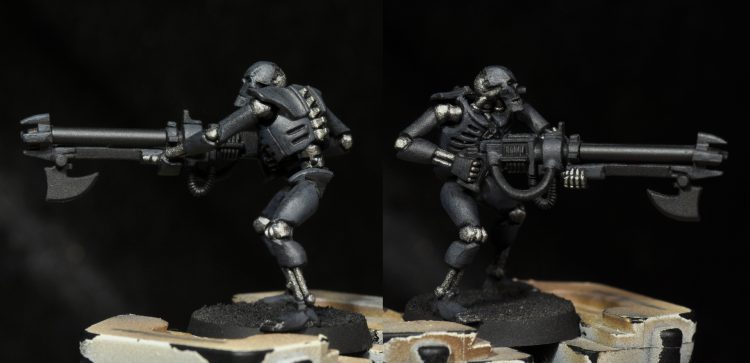
First edge highlight: A mix of Basalt Grey and a bit of the base color plus 10-20% Dark Prussian Blue (to taste) again. This is put on as thicker edge highlight and over the whole face. (At this point I also went back and did the axe and haft in leadbelcher, then gave it a wash. I fixed the brown wash later to match the rest of the metals.)

Second edge highlight: Stonewall Grey 1:1 with Basalt Grey and a small amount (in the 10-20% range again) of Temple Guard Blue. This is a finer highlight along all the edges. Then the same color was used to paint the whole face again along with the gauss tube, wires, and coils on the gun. The wires hanging out of the chest were painted this too, along with the raised portion of the chest emblem. 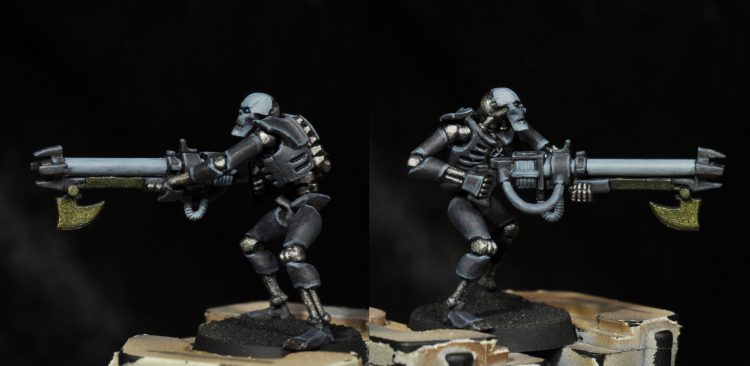
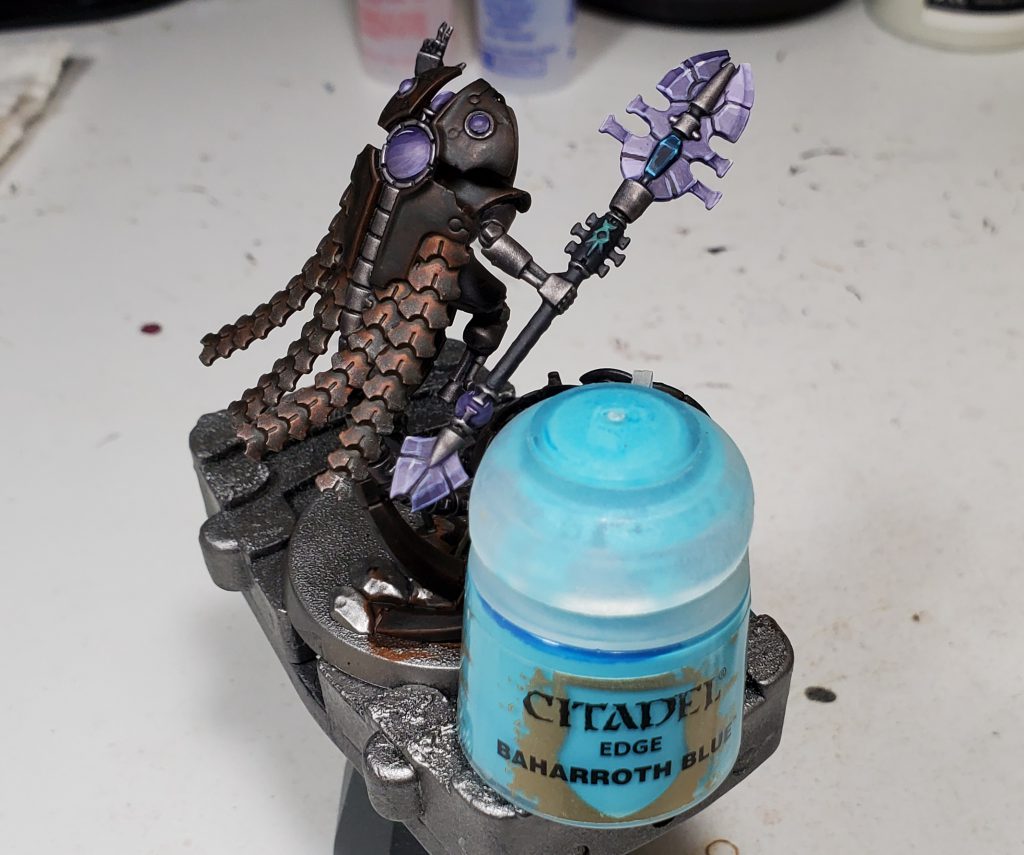
Third edge highlight: Stonewall Grey and plus 10% or so Temple Guard Blue was done as the final edge highlight on most of the body, focusing on the top edges and sharpest corners and covering less area that the last one. This mix was also painted over most of the face, leaving the recesses as the previous layer. It was also used to paint the emblem, edges of wires and gauss coils, and squiggled along the sides and top of the gauss tube as the first layer of the energy effect. 
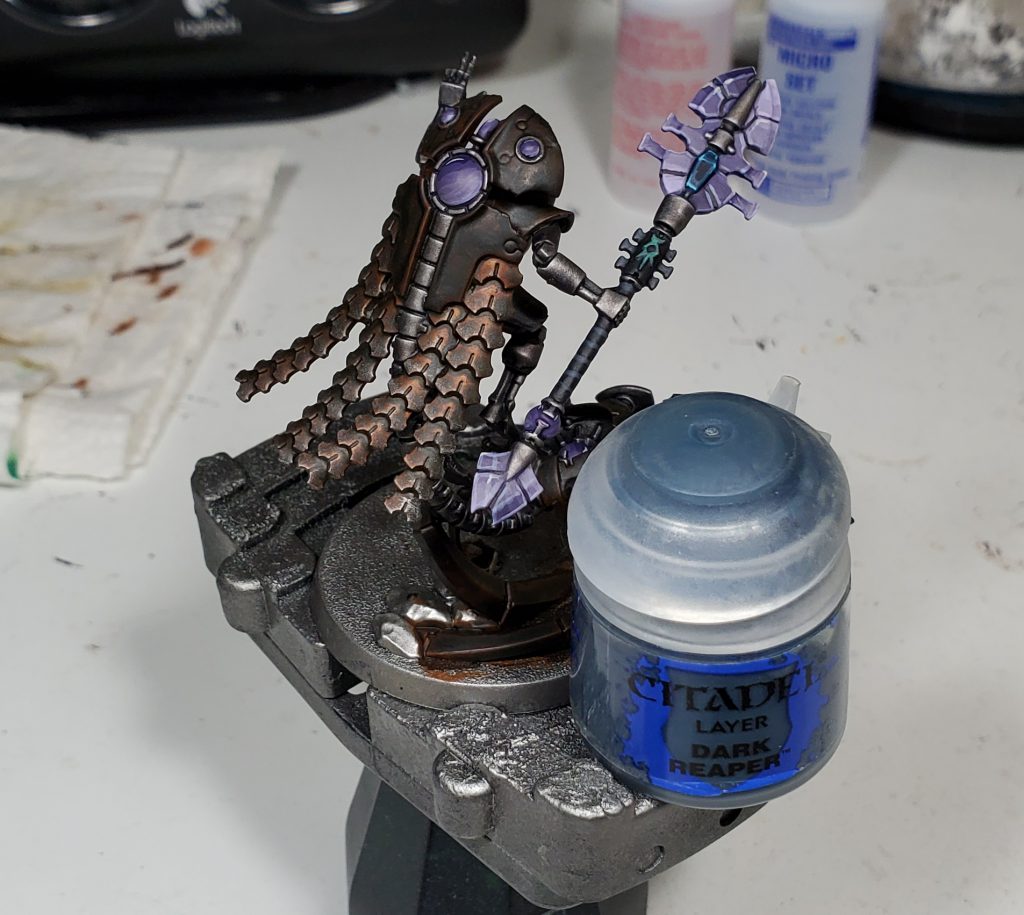
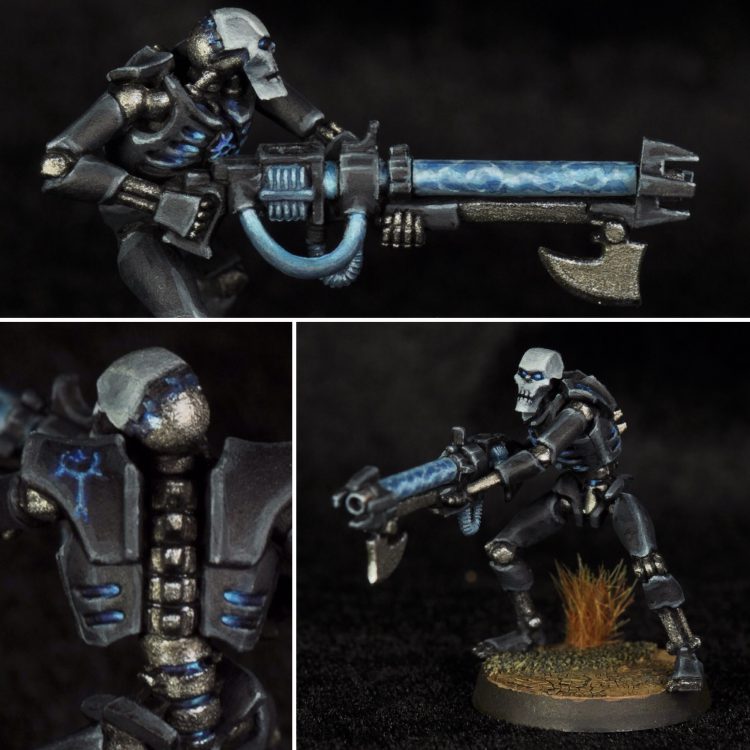
Blues: Pure Temple Guard Blue was used to edge all the gauss wires and coils, and the eyes and emblem. I put a small drop of Indigo ink on my wet palette and thinned it with water until it was transparent. This was put into the eye sockets, the mouth lines, and dabbed along the gauss tube between the previously painted light areas. It was also allowed to flow into the recesses on all the wires and coils. 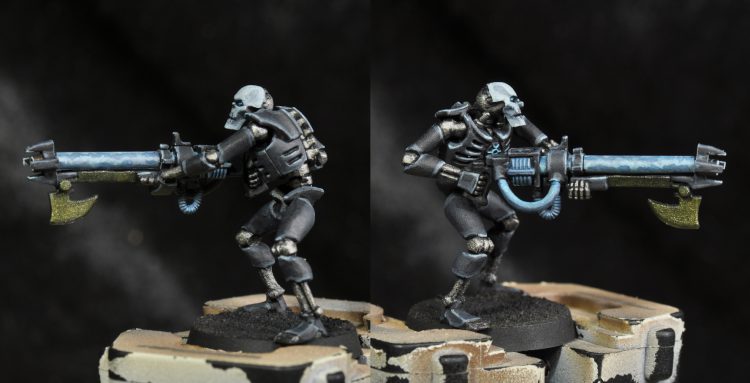 White highlights: White is put on the sharp corners of the face, dabbed along the bright areas of the gauss tube, and on the most raised portions of the gauss coils and wires. At this stage I could call this guy done, he's ready for the battlefield.
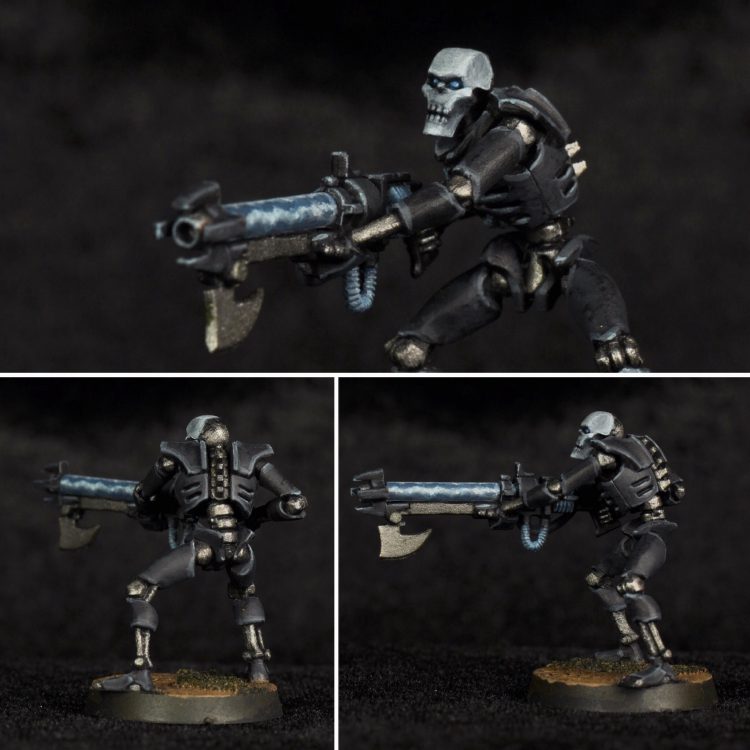
Refined: To push this one a bit further I glazed over the gauss bits with a transparent mix of Temple Guard Blue and glazing medium, then glazed white at the edges again and refined some of the electric effect with glazes of white. The glow in rib cage was done starting with a coat of Prussian Blue in the whole recess. Then layer Ultramarine Blue was painted in half of the recess toward the spine and emblem, followed by half that area covered by Temple Guard Blue. Next was a transparent glaze of Ultramarine Blue to smooth the color transitions, and finally a mix of Temple Guard Blue and White in the center corner of the recess.
Cowie's Method
I've gone with a worn bone / marble method, styled heavily on the kind of abandoned and overgrown temples you might find in the jungles of south-east Asia (or the Overwatch Bastion backstory video, depends on how cultured you fancy being). Having painted Space Marines with multi-step highlighting, I wanted to go with something significantly simpler to paint. I undercoated the entire model with a light grey primer, then washed the model twice with GW Agrax Earthshade. I then did a very heavy drybrush over the top with VMC Ivory, which produced a stippled texture like some sort of pitted stone. The bronze parts were painted with GW Balthazar Gold and the silvers with VMA Gunmetal, then both washed with Nuln Oil. The green pipes and eyes (not the blade) were undercoated with GW Stormhost Silver, then covered with the new technical Tesseract Glow. This is very easy and gets them to 'battle ready' status, but the weathering is what makes them pop. Weathering was achieved with AK Interactive Moss Deposits, which is an enamel paint with some suspended grit texture in it. This was my first time using enamels so I can't offer much useful tips on using them, but I found their ability to be remobilised with white spirit to be really interesting and something I will work with in the future. I brushed this inside crevasses in the armour and in streaks on the exposed surfaces, trying to mimic the shape of moss from dripping water. I also used a light drybrush ofVMC Smoke as a brown to add a bit of dirt texture to some spots. I also added some large patches of moss on the overlord and warden above usingAK Interactive Moss Texture, which is a lot like green flock or very fine foam. I mixed this with thinned PVA glue and put patches fairly randomly over the entire model. The green phaseblade was very intimidating to start with as I had never really done any blending before, but it turned out to be very simple. I used the standard technique, as shown very well by Juan Hidalgo here. I used a wet blend from GW Dark Angels Green -> GW Warpsone Glow -> GW Moot Green -> 50/50 GW Yriel Yellow / GW Moot Green, then edge highlighted with 50/50 Yriel Yellow / White.
How to Smoosh Necrons, Beanith Style
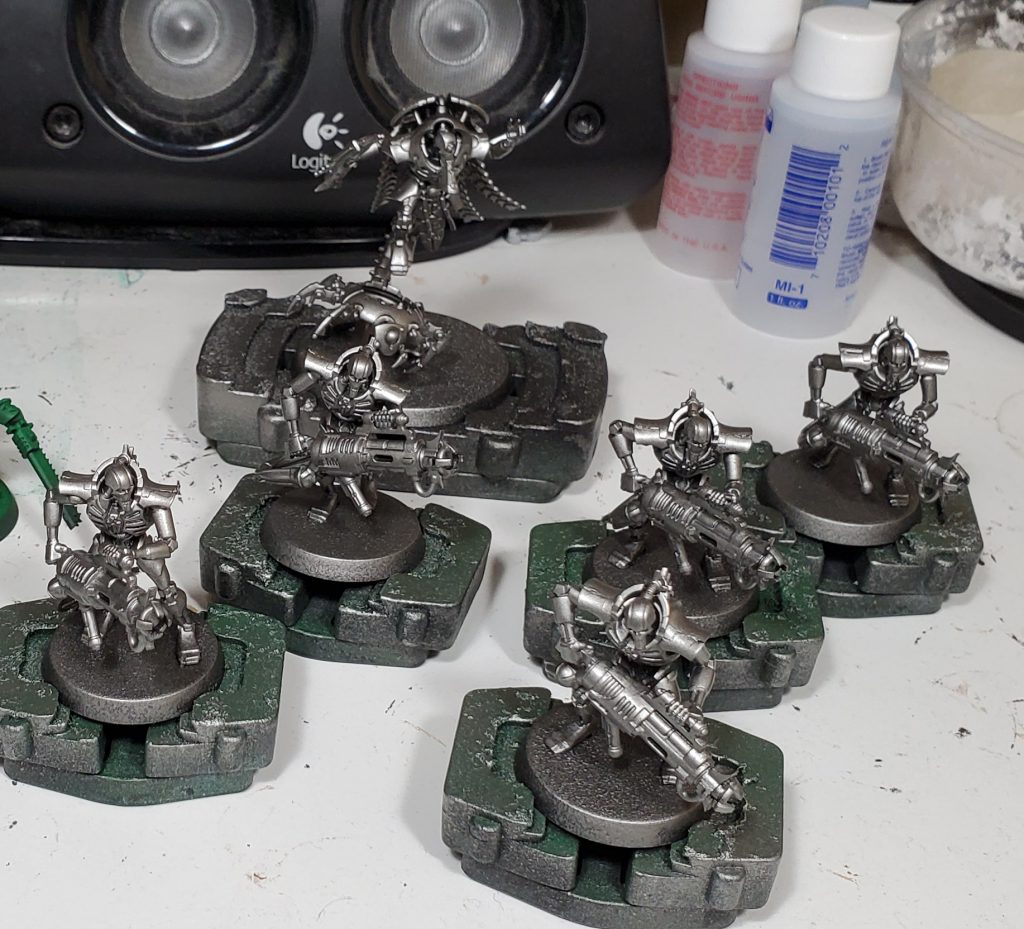
Here at Goonhammer, the editors have their best ideas at 5am in Downunder time, the perfect time to convince a bleary-eyed Beanith to take on extra hobby work. So when Rob "TheChirurgeon" Jones loudly proclaimed that "It is time for HTPE: NECRONS". I either said "yes" without giving it much thought (I'm never at my best before my first dose of caffeine), or I got "voluntold" into the content mines so I could submit my quick contrast paint-smooshing technique to this article for our beloved site and its Overlords… also I think Liam mentioned something about there being Punch and Pie as well? 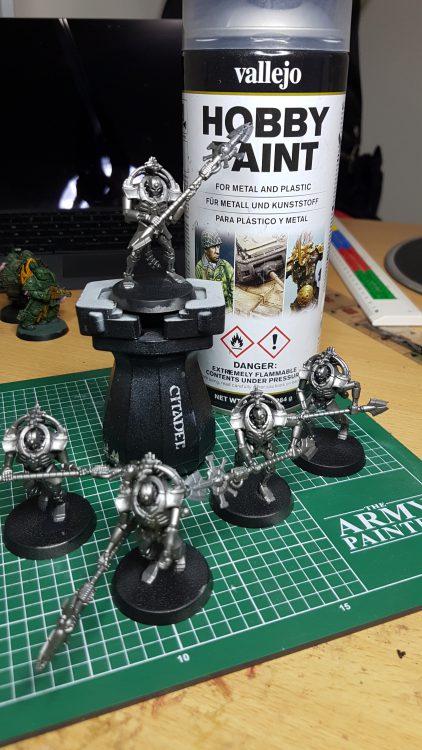 Step 1. Hit them with a coat of metallic grey spray paint and then celebrate a job well done with punch and pie. Rob: Where are the rest of the steps? Beanith: Oh you wanted fancy Necrons? Fine.
 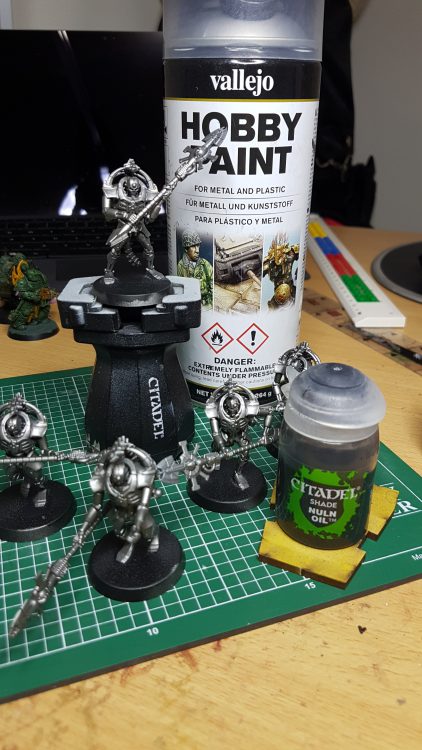 Step 2. Get the Nuln Oil out from it's high security shrine and then Smoosh on the magical Nuln Oil and marvel at how much better your model looks. And then celebrate a job well done with punch and pie. Rob: …and then? Beanith: There is no "and then!" Hahahaha, oh that was a cinematic masterpiece of a film. …Oh, I see you have your motivational stick with you… fuck. Rob: Look, the only way this ends is either with a guide to Contrast Painting all five Necron Dynasties or with fresh photos of Spider-Man on my desk tomorrow. Beanith: Well I did hurt my back recently so
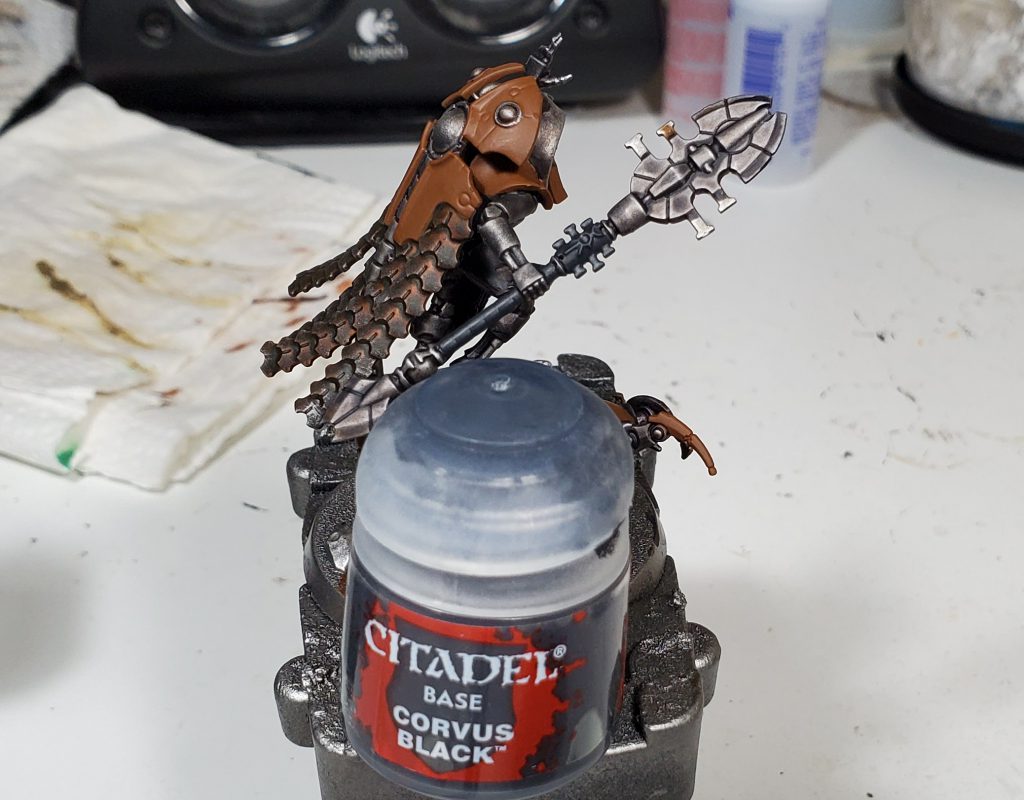
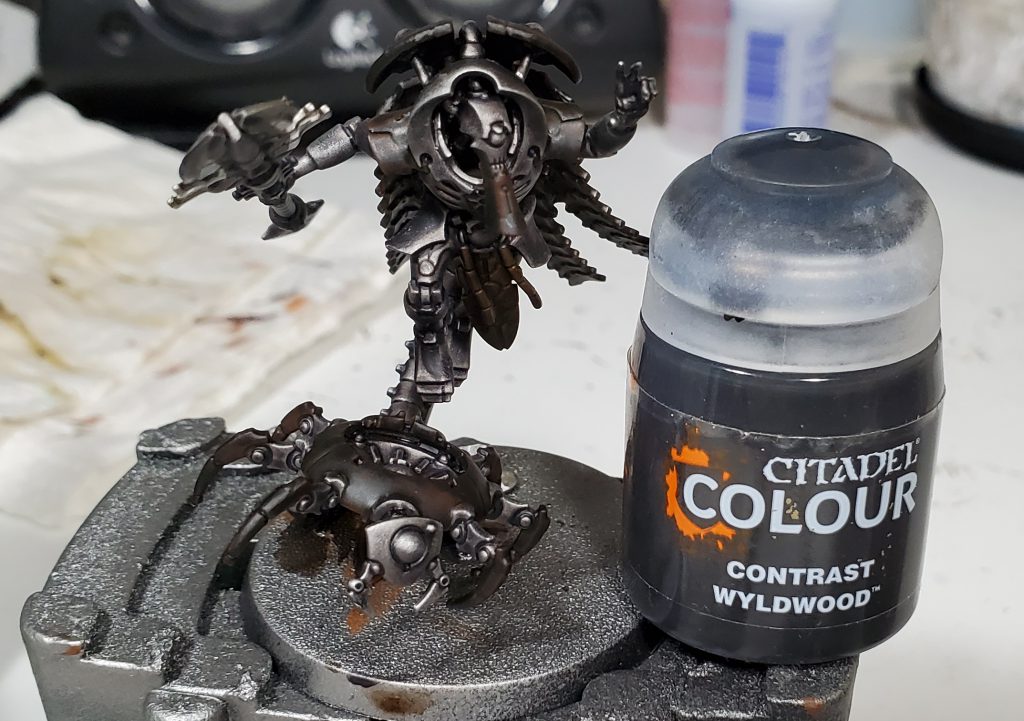
 web slinging chasing after Spider-Man is out. Time to smoosh me some Necrons! Rob: He's a menace, you know. Beanith: Damn Straight. Ok, 5 Dynasties of Necrons, that's Sautekh… and the other four which are just as good and competitive? Can do. One of the great things about Necrons is that the rank and file don't have much colour to worry about – your typical Necron Warrior tends to be mostly grey/silver with the focal point of the model being the stonking great big raygun they carry. The more elite they are, the more colours you'll want to smoosh on there so to be a bit more comprehensive I've gone with some Necron Triach Praetorians. Rob: Triach Praetorians don't belong to Dynasties. They protect the dynasties of various tombworlds so that… Beanith: Look, it's called 'artistic licence.' And to be fair, there is an example of a Sautekh Triach Praetorian in the codex too so QED or whatever the fancy latin term is for "look, there's a distraction over there!" As stated at the beginning, I've undercoated all 5 with a metallic grey undercoat so when I do smoosh the contrast paints, I get some lovely colours and still retain the metallic nature of the Necrons. And of course, you can use this method to smash out the bulk of the force, have something tabletop ready quickly and give you plenty of time to focus on the characters, tanks, punch and pie, etc.
Sautekh – Accurate Pew Pew
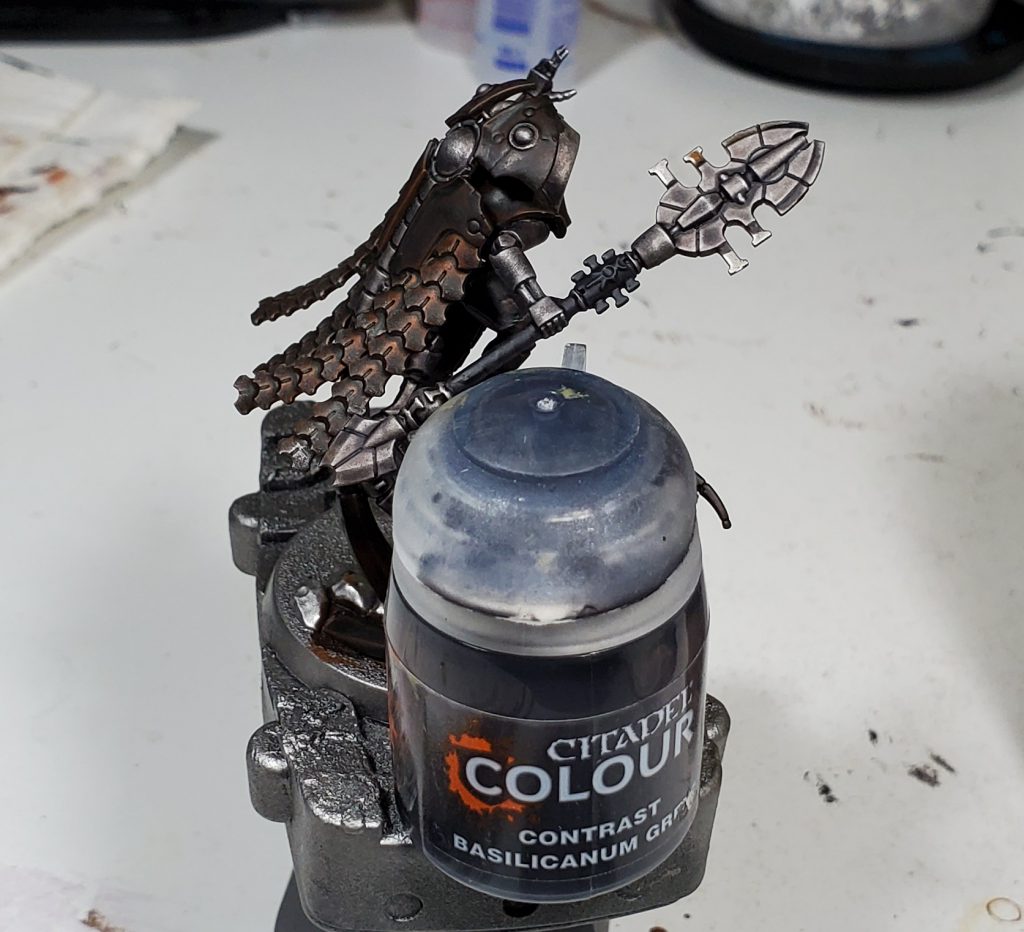
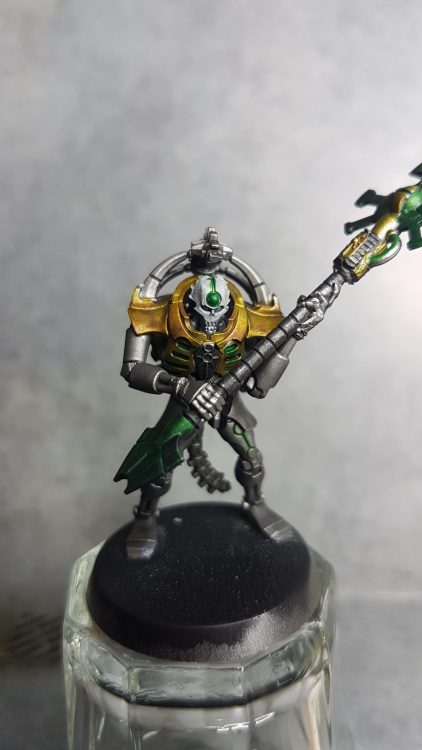 I used Contrast Nazdreg Yellow and decided it was too gold for my liking. A quick smoosh of Shade Seraphim Sepia really dulls it down and gives it the bronze colour I was looking for. Smoosh on some Base Wraithbone on the face plate and call it done son.
Mephrit – Bonus AP Pew Pew
 I wanted a nice dark green here so I dug out the Contrast Ork Flesh and once again I smooshed on some Base Wraithbone on the face plate.
Novokh – Reroll melee… wait, really?
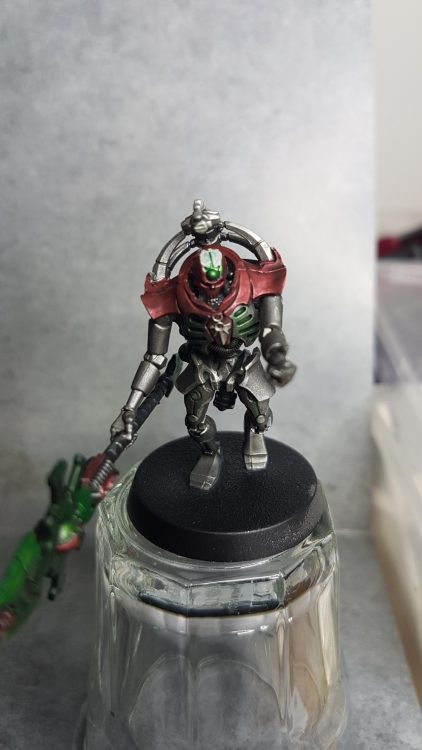 I liked how this one turned out, I've always been a fan of metallic reds. Ooooh, new project idea, maybe I should do some 30k style Thousand Sons? Anyhow, here I used the Contrast Blood Angels Red and another quick Base Wraithbone job on the face plate.
Nephrekh – A major case of Zoom Zoom
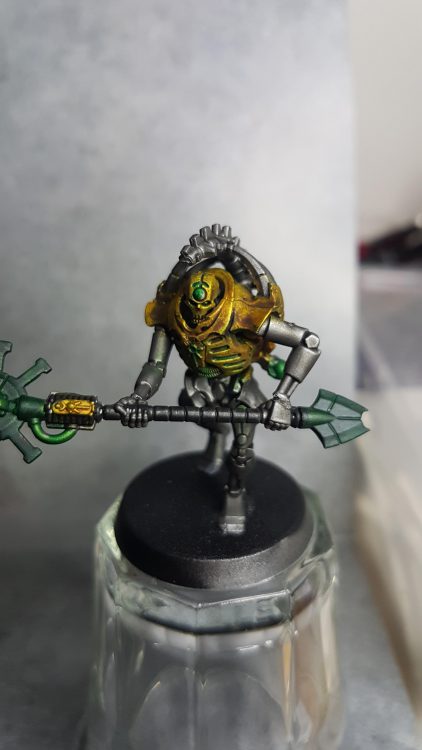 Broke out the Tamiya Gold Leaf here but any metallic gold will do. After that I used the Contrast Iyanden Yellow to give it a more reddish hue of gold.
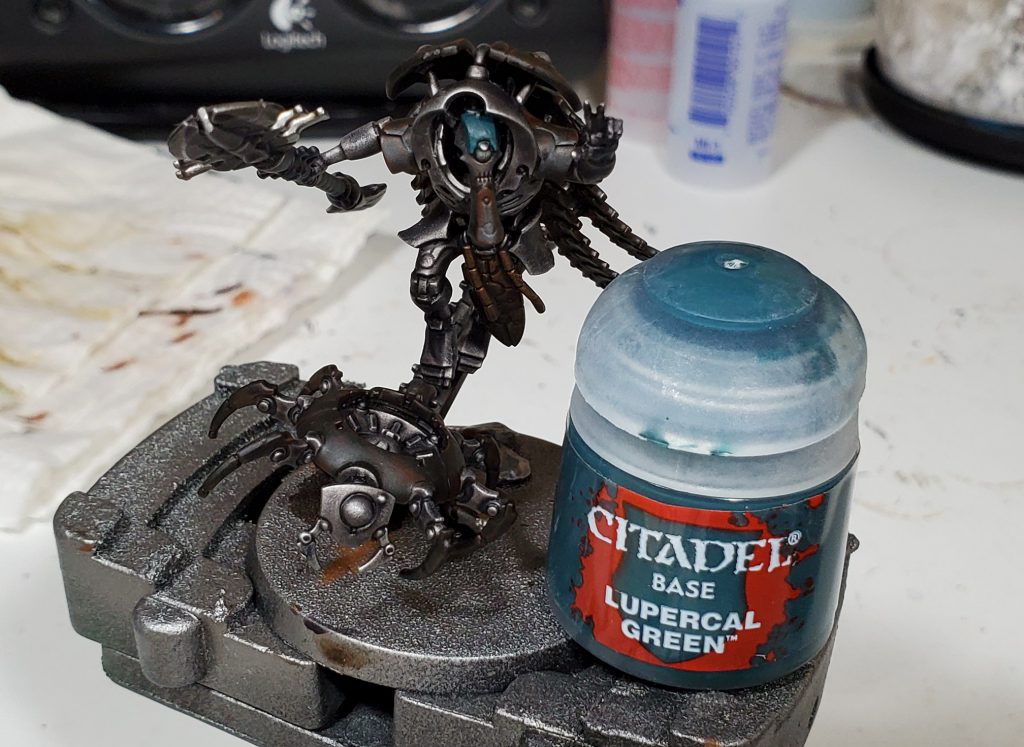
Nihilakh – Movement is for suckers
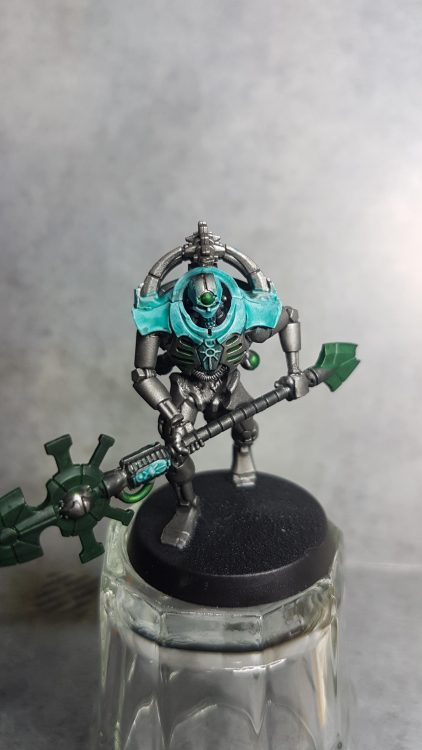 Contrast Aethermatic Blue is almost in the Glaze range when it goes over anything other than Greyseer or Wraithbone so here I did a layer of Greyseer first and then two coats of Contrast Aethermatic Blue for a very nice teal.
Weapons, Glowly Chest inserts, pipes, bits and Head Nipple
The weapons were all given a coat of Contrast Black Templar and then some Contrast Warp Lightning on top. I've also smooshed in Contrast Warp Lightning inside the grooves in the chest, the pipes in the stomach, the balls on their back and on their power button on their forehead. I also did the recess on the thigh too while I was there.
Finishing touches
Nuln oil… just smoosh Nuln oil on all the grey metal. Go to town with it in the recesses not already claimed by Contrast Warp Lightning. Boom, job done. Five Necrons ready to bring the beep boop. Time for Punch and Pie now Rob? 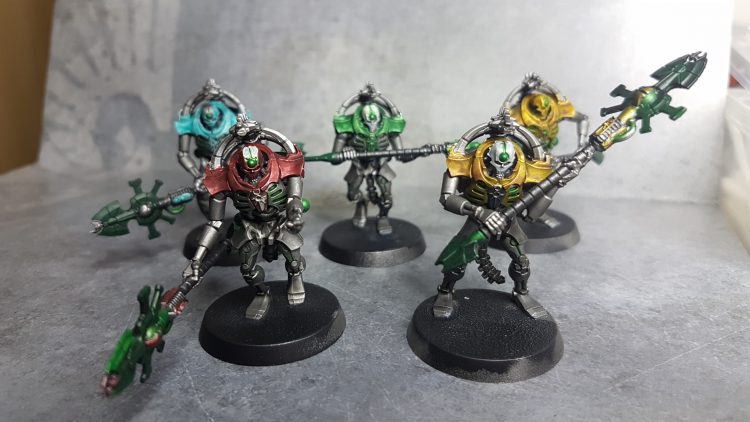 Rob: You gonna edge highlight the shoulder armor or just go contrast only on them? Beanith: Contrast means I don't have to edge highlight things. Rob: Go on. maybe just the one. See if you like it, it can't hurt right? Beanith: Next you'll be telling me all the cool kids are doing it. Fiiiiiiine, I'll grow as an artist and challenge myself with new techniques, yadda yadda yadda. Is he gone? Excellent, okay for this, you'll want a nice fine brush and a pot of silver paint…
  and then listen to the other writers because I'm going to annoy purists by ignoring all that fiddly stuff by going straight to the silver Sharpie marker pen.
 " data-image-caption="" data-medium-file="https://d1w82usnq70pt2.cloudfront.net/wp-content/uploads/2020/05/IMG_20200512_200010_452.jpg" data-large-file="https://d1w82usnq70pt2.cloudfront.net/wp-content/uploads/2020/05/IMG_20200512_200010_452.jpg" src="https://d1w82usnq70pt2.cloudfront.net/wp-content/uploads/2020/05/IMG_20200512_200010_452.jpg" alt="" width="554" height="554" srcset="https://d1w82usnq70pt2.cloudfront.net/wp-content/uploads/2020/05/IMG_20200512_200010_452.jpg 554w, https://d1w82usnq70pt2.cloudfront.net/wp-content/uploads/2020/05/IMG_20200512_200010_452-150x150.jpg 150w" sizes="(max-width: 554px) 100vw, 554px" data-old-data-orig-file="https://d1w82usnq70pt2.cloudfront.net/wp-content/uploads/2020/05/sharpie.jpg" data-old-data-medium-file="https://d1w82usnq70pt2.cloudfront.net/wp-content/uploads/2020/05/sharpie-750x422.jpg" data-old-data-large-file="https://d1w82usnq70pt2.cloudfront.net/wp-content/uploads/2020/05/sharpie-1024x576.jpg" data-old-src="data:image/svg+xml,%3Csvg%20xmlns=%22http://www.w3.org/2000/svg%22%20viewBox=%220%200%20750%20422%22%3E%3C/svg%3E" data-src="https://d1w82usnq70pt2.cloudfront.net/wp-content/uploads/2020/05/sharpie-750x422.jpg" data-srcset="https://d1w82usnq70pt2.cloudfront.net/wp-content/uploads/2020/05/sharpie-750x422.jpg 750w, https://d1w82usnq70pt2.cloudfront.net/wp-content/uploads/2020/05/sharpie-768x432.jpg 768w, https://d1w82usnq70pt2.cloudfront.net/wp-content/uploads/2020/05/sharpie-1024x576.jpg 1024w, https://d1w82usnq70pt2.cloudfront.net/wp-content/uploads/2020/05/sharpie-1920x1080.jpg 1920w"> I've highlighted the backpack ribs and thigh plates and dotted various bolts and the fingers. I will admit it does look better.
" data-image-caption="" data-medium-file="https://d1w82usnq70pt2.cloudfront.net/wp-content/uploads/2020/05/IMG_20200512_200010_452.jpg" data-large-file="https://d1w82usnq70pt2.cloudfront.net/wp-content/uploads/2020/05/IMG_20200512_200010_452.jpg" src="https://d1w82usnq70pt2.cloudfront.net/wp-content/uploads/2020/05/IMG_20200512_200010_452.jpg" data-src="https://d1w82usnq70pt2.cloudfront.net/wp-content/uploads/2020/05/IMG_20200512_200010_452.jpg" alt="" width="554" height="554" data-srcset="https://d1w82usnq70pt2.cloudfront.net/wp-content/uploads/2020/05/IMG_20200512_200010_452.jpg 554w, https://d1w82usnq70pt2.cloudfront.net/wp-content/uploads/2020/05/IMG_20200512_200010_452-150x150.jpg 150w" data-sizes="(max-width: 554px) 100vw, 554px" srcset="https://d1w82usnq70pt2.cloudfront.net/wp-content/uploads/2020/05/IMG_20200512_200010_452.jpg 554w, https://d1w82usnq70pt2.cloudfront.net/wp-content/uploads/2020/05/IMG_20200512_200010_452-150x150.jpg 150w"> After that I've done the blades of the weapon and then went back with Contrast Warp Lightning, not super happy with the results, next time I might aim for a wavy pattern and not just a solid silver line… oh boo, I did grow as an artist. And I suppose the punch and pie is an Allegory too. Rob:The real punch and pie were the techniques we learned along the way.
Final Thoughts
As we gear up for the launch of an entirely new Necron range, we hope we've armed you with what you need to go paint your own implacable hordes. And if you're looking for more, you can find a detailed write-up of how to paint Illuminor Szeras here. As always, if you have any questions or feedback, or you just want to share your pretty models with us, feel free to drop us a note in the comments below, or email us at contact@goonhammer.com.

Black and Tan Paint Scheme Silverado
Source: https://www.goonhammer.com/how-to-paint-everything-necrons/